

Microsoft Project Online has long been popular among project managers, providing comprehensive tools and features to streamline project planning, collaboration, and execution.
However, migrating from Microsoft Project Online can be increasingly relevant due to changing business requirements, cost considerations, or simply exploring different features and capabilities.
In this guide, we will explore 8 ways to migrate from MS Project Online – both native options provided by Microsoft and third-party solutions.
Let's explore the various methods and strategies you can employ to migrate from Project Online today.
Table of contents
- Why might you need to migrate from MS Project Online?
- Considerations for a successful migration from Project Online
- Native Project Online migration options to consider
- Available third-party MS Project Online migration options
- Microsoft Project Online migration: small tips to make it easy
- Maximizing project management potential after Project Online migration
Why might you need to migrate from MS Project Online?
While Microsoft Project Online has been a popular and reliable project management solution for many organizations, there are several compelling reasons why you might consider migrating to an alternative platform.
Here are some key factors to consider:
- Migrate to a different platform that aligns better with your evolving project management needs, considering evolving business requirements.
- Find alternative solutions that offer cost savings or flexible pricing options.
- Choose a platform with better integration capabilities to streamline workflows and ensure compatibility with your existing systems.
- Gain a competitive edge by migrating to a platform that offers enhanced features and functionality.
- Migrate to a platform that offers greater customization and automation possibilities, allowing you to tailor the solution to your specific needs.
- Improve user satisfaction and productivity by migrating to a platform with a more intuitive interface, enhancing user experience, and facilitating adoption.
Understanding why migrating from MS Project Online is necessary sets the stage for the key considerations for a successful migration process in the next part of our article.
Considerations for a successful migration from Project Online
Migrating from Project Online to a different project management solution requires careful planning and execution.
You should consider several key pieces of advice to ensure a successful migration process.
Let's explore them:
#1 Assessing project complexity and scope
This includes identifying any unique project characteristics, such as custom fields, task dependencies, or resource allocations, that may require special attention during the migration.
#2 Data validation and clean-up
It's essential to validate the data in your MS Project Online environment, ensuring accuracy and consistency before migrating it to the new platform.
Conduct a thorough review of project schedules, resource assignments, and other relevant data to identify and resolve any inconsistencies or errors.
#3 Managing dependencies and constraints
These dependencies can include task interdependencies, resource dependencies, or constraints related to deadlines, budgets, or resource availability.
Utilizing a specialized migration and integration tool can help you analyze and map dependencies accurately, ensuring a smooth transition and minimizing disruptions to project schedules.
#4 Communication and stakeholder engagement
Provide clear guidelines and timelines to manage expectations and ensure a smooth transition. Engage key stakeholders in the decision-making process, solicit their input, and address any concerns or questions they may have.
Armed with the essential considerations for a successful migration from Project Online, let's now explore the native migration options that can help facilitate a smooth transition to a new project management solution.
Native Project Online migration options to consider
Migrating from MS Project Online requires careful consideration of the native migration options provided by Microsoft. These options offer flexibility and compatibility within the Microsoft ecosystem while minimizing disruptions to ongoing projects.
Let's explore Microsoft's native migration options, enabling a smooth and efficient migration from Microsoft Project Online to the platform of your choice.
Method 1: Exporting to Microsoft Excel
One of the native migration options provided by Microsoft for migrating from Project Online is exporting project data to Microsoft Excel. This method offers flexibility and compatibility for further analysis or migration to other platforms.
Follow these actionable instructions to export your project data. To export Project Center data to Excel:
- Go to the “Projects” section in the “Quick Launch” menu.
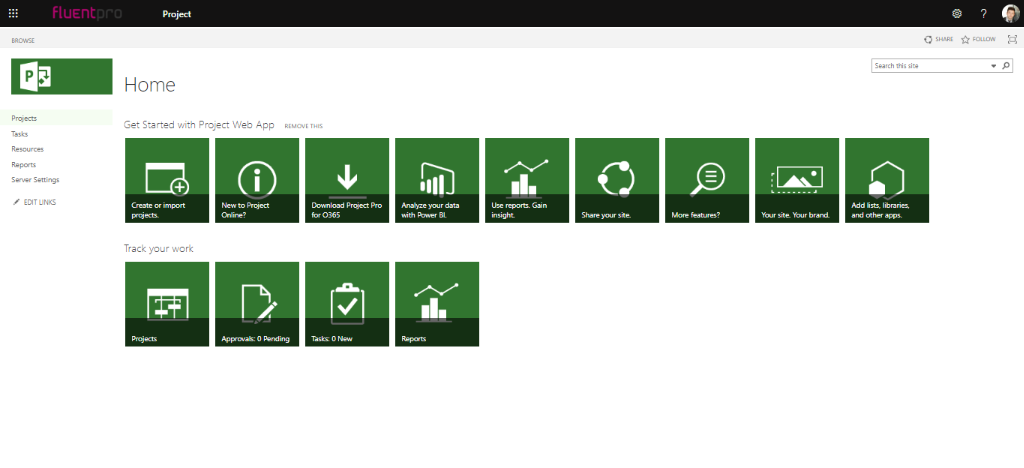
- Click "Export to Excel" in the “Share” group on the “Projects” tab.
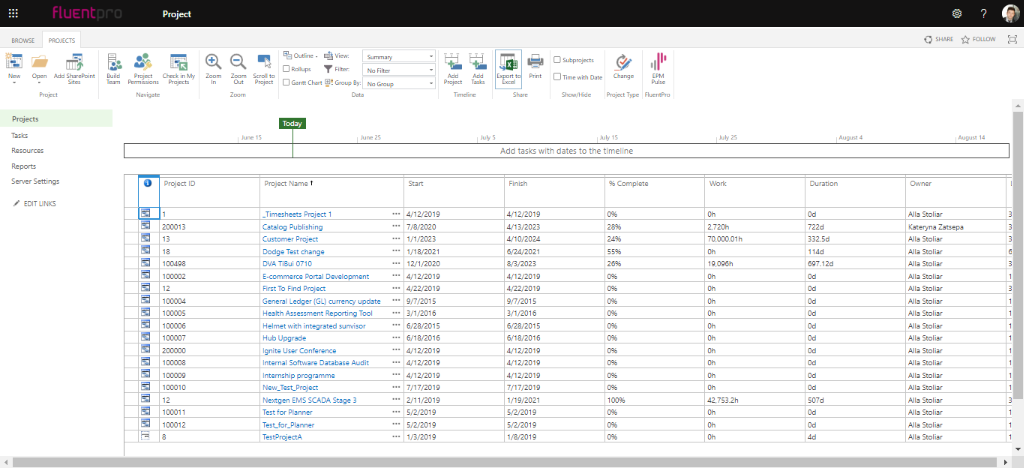
To export task-level data from all and single projects to Excel:
- Go to the “Projects” section in the “Quick Launch” menu.
- Select the desired project from the “Project Center” list.
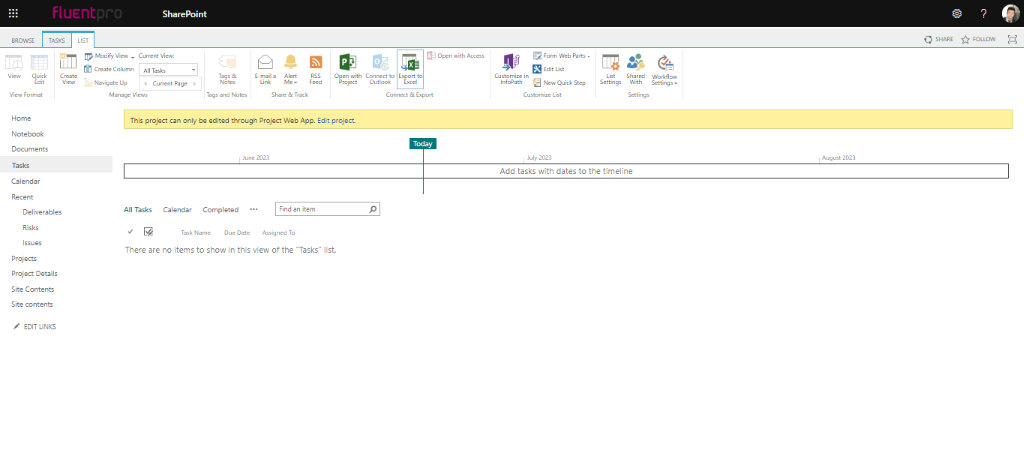
- Click "Export to Excel" in the “Share group” on the “Options” tab in the “Task” section or the “List” section if you want to export data from a separate project.
Congratulations! You have successfully exported your project data from Project Online to Microsoft Excel. Now you can use it to create dashboards in Excel or analyze data manually.
After exporting project data to Microsoft Excel, the next step is to use it autonomously or seamlessly import it into Microsoft Project Desktop for further project management and execution.
Method 2: Saving files locally with Project Desktop
Another native migration option provided by Microsoft for migrating from MS Project Online is importing project data to Microsoft Project Desktop, a locally installed application for further management, analysis, or online collaboration.
Follow these instructions to import your project data using the prepared Excel file:
- Export the Excel file, as we already discussed earlier in Method 1.
- In Project Desktop, go to “File” → “New”. Click “New from Excel workbook” on the New page.
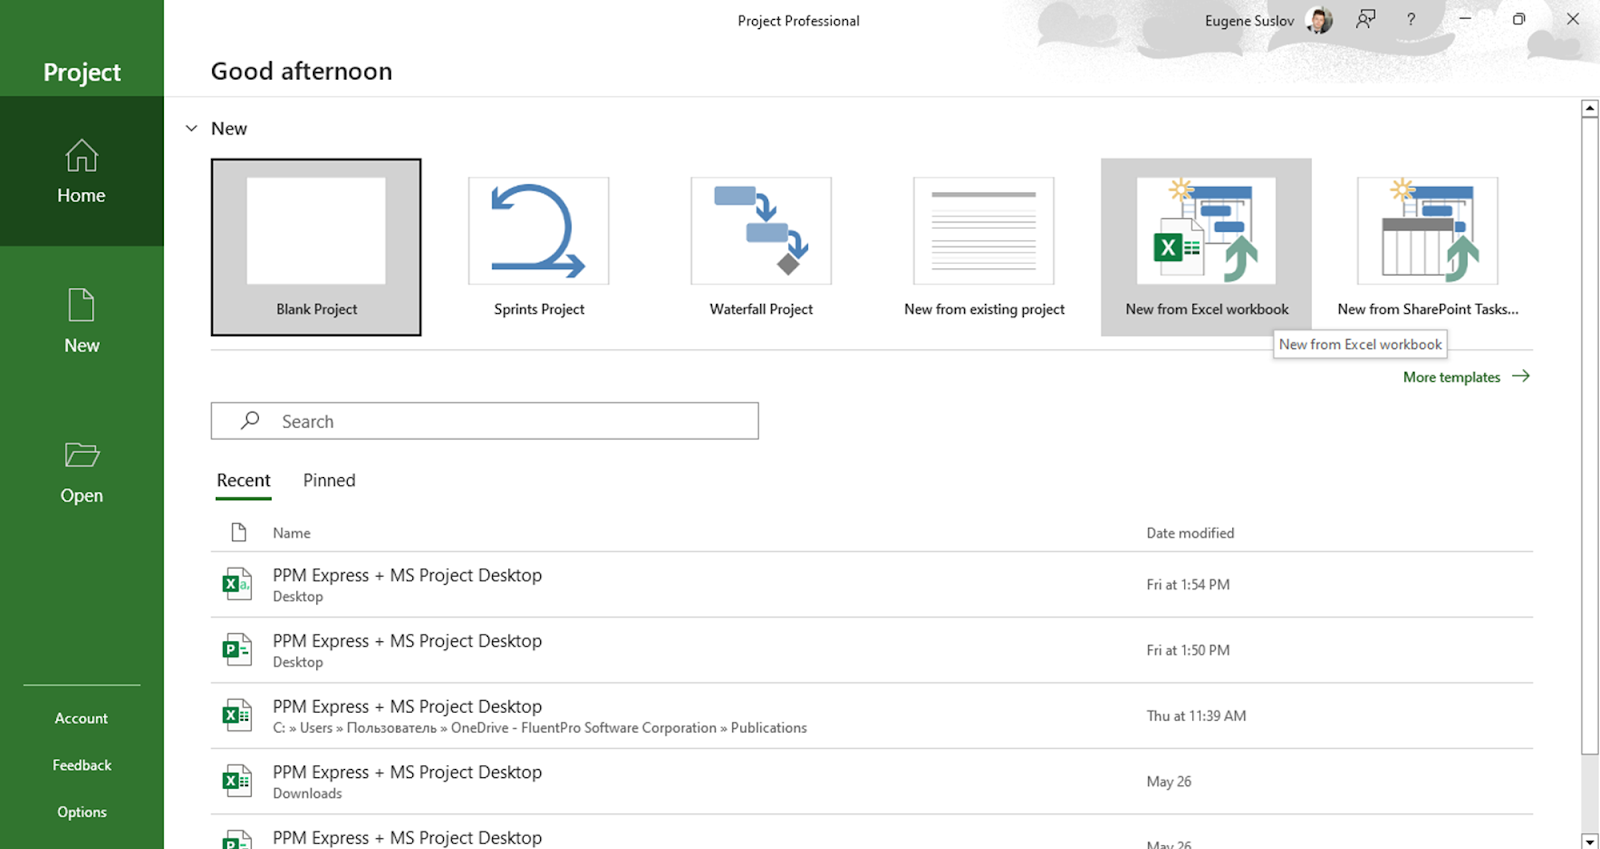
- Choose the Excel workbook you want to import and click “Open”. Follow the Import Wizard steps:
- Click “Next” to start.
- Create a map from scratch or choose a predefined map that matches your data. Import your data into a new project or an existing project.
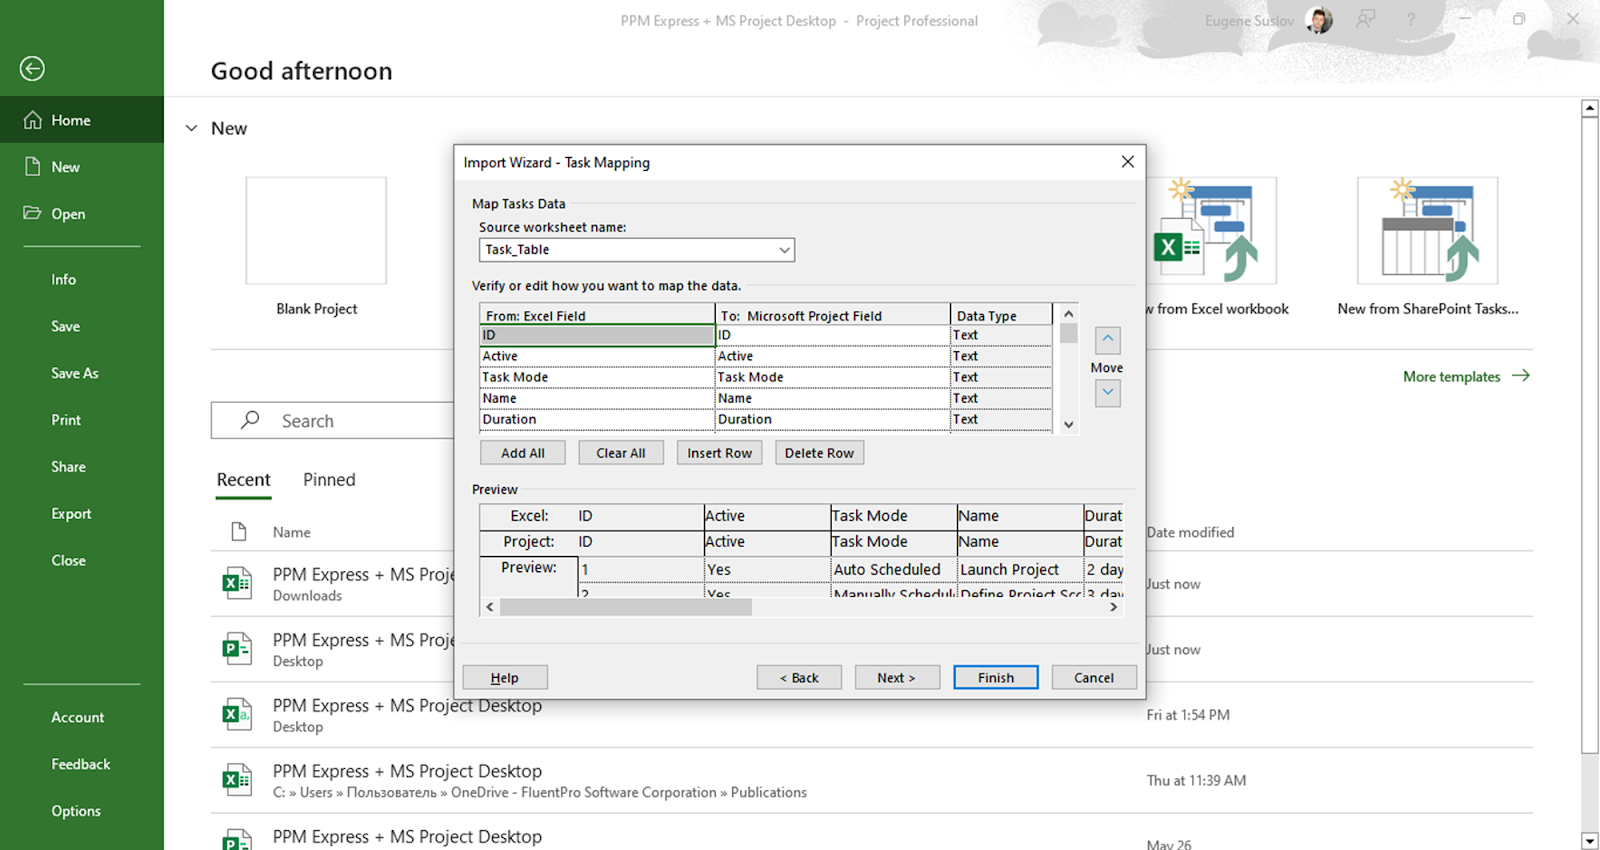
- Select the type of information you're importing. Verify and adjust the mapped fields.
- Click “Save Map” if you want to reuse it, and then click “Finish” on the last step.
You can also directly connect your Microsoft Project Online with Project Desktop client. Here is how to do it:
- Go to the “File” menu and select "Info", then choose "Manage Accounts".
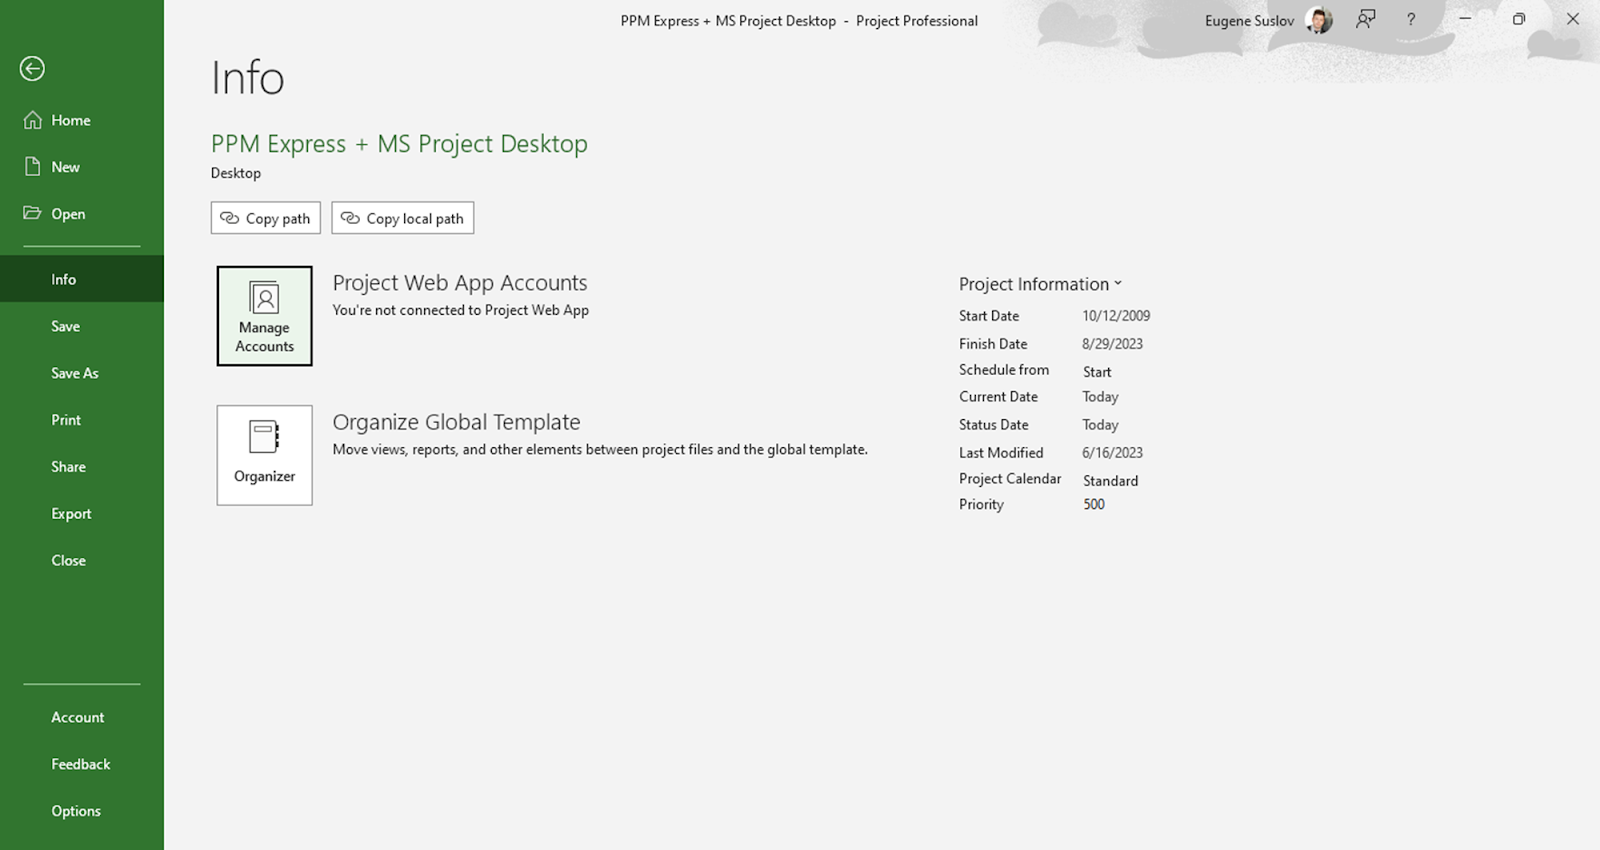
- On the “Project Web Apps Accounts” page, click "Add”. On the Account Properties page:
- Enter the name of the account.
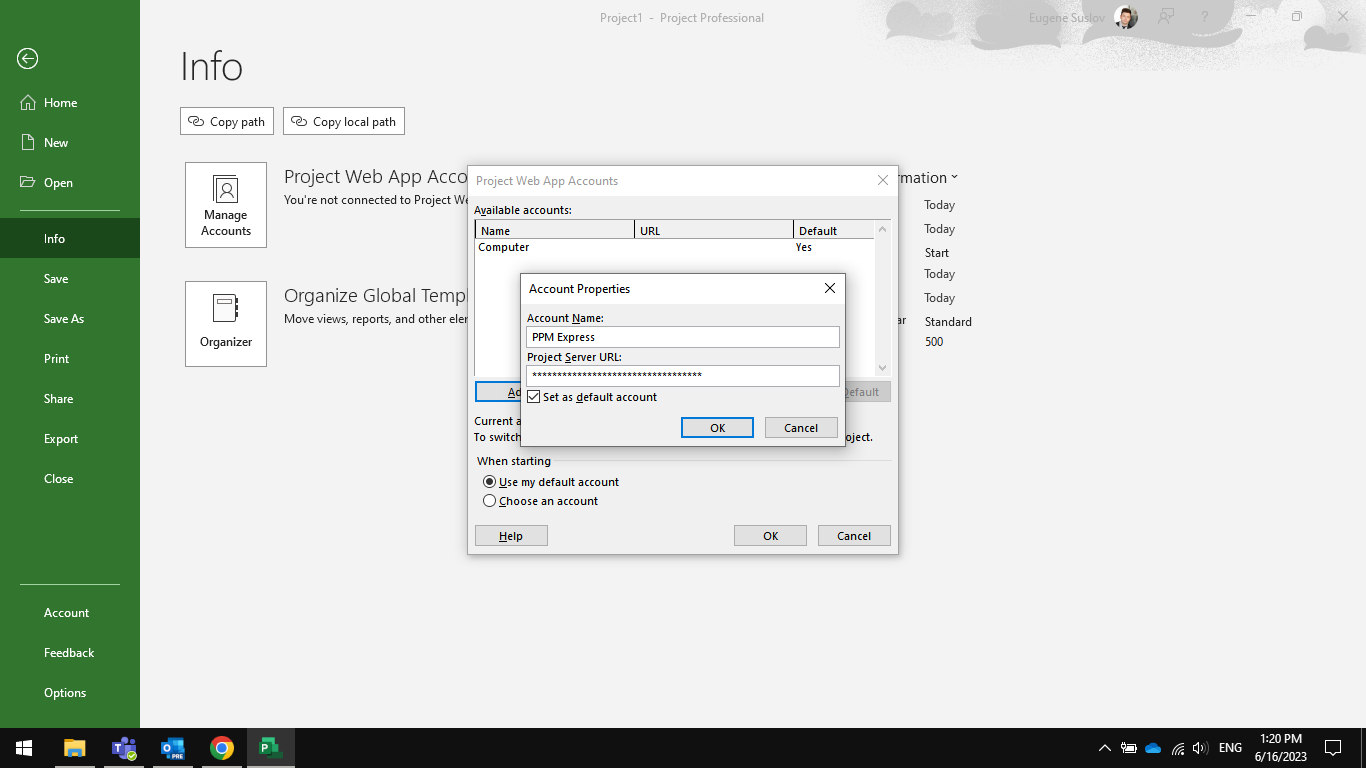
- Type the URL for your Project Web App homepage in Project Online.
- Optionally, select "Set as default account" to use it as the default profile. Click OK.
- Your new account will now be listed on the Project Web App Accounts page. Click OK.
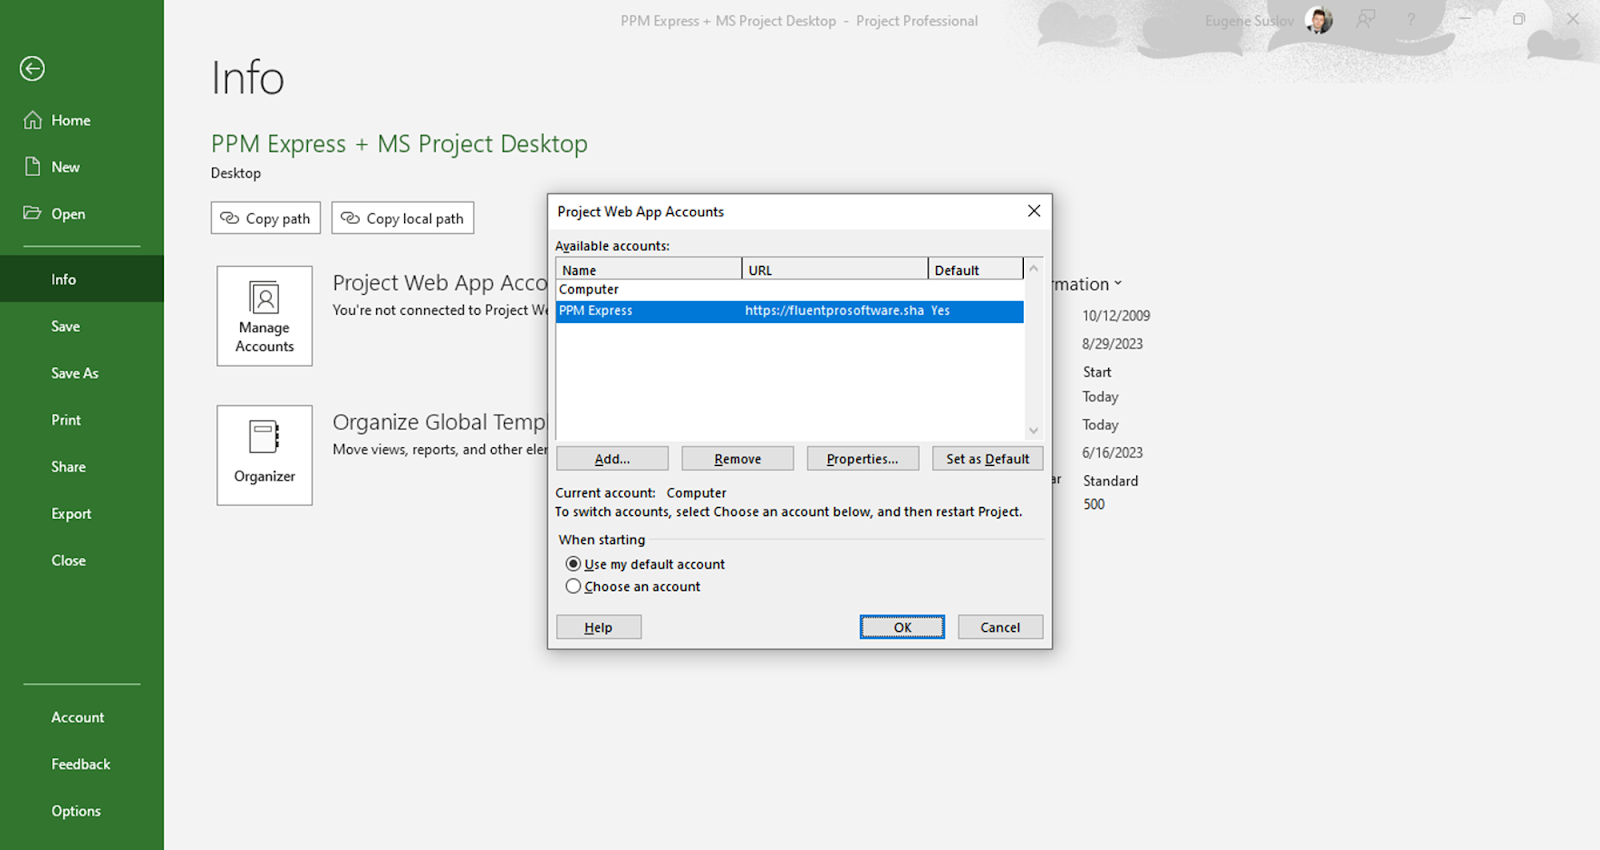
- Close and reopen the Project Online Desktop Client. At the login window, select your account and click OK to connect to Project Online.
Note: If you want to use both Microsoft Project Desktop and Project Online to get a comprehensive overview of your projects, explore project portfolio management platforms like PPM Express, which lets you connect simultaneously to both tools.
Congratulations! You have successfully imported your project data from MS Project Online to Microsoft Project Desktop.
Another option is migrating to Microsoft Planner for a more collaborative and task-oriented project management approach.
Method 3: Migrating to Microsoft Planner
Microsoft Planner offers a native migration option for organizations transitioning project data from Project Online to a more lightweight solution.
Follow these instructions to migrate your project data from Microsoft Project Online to Microsoft Planner by using Power Automate:
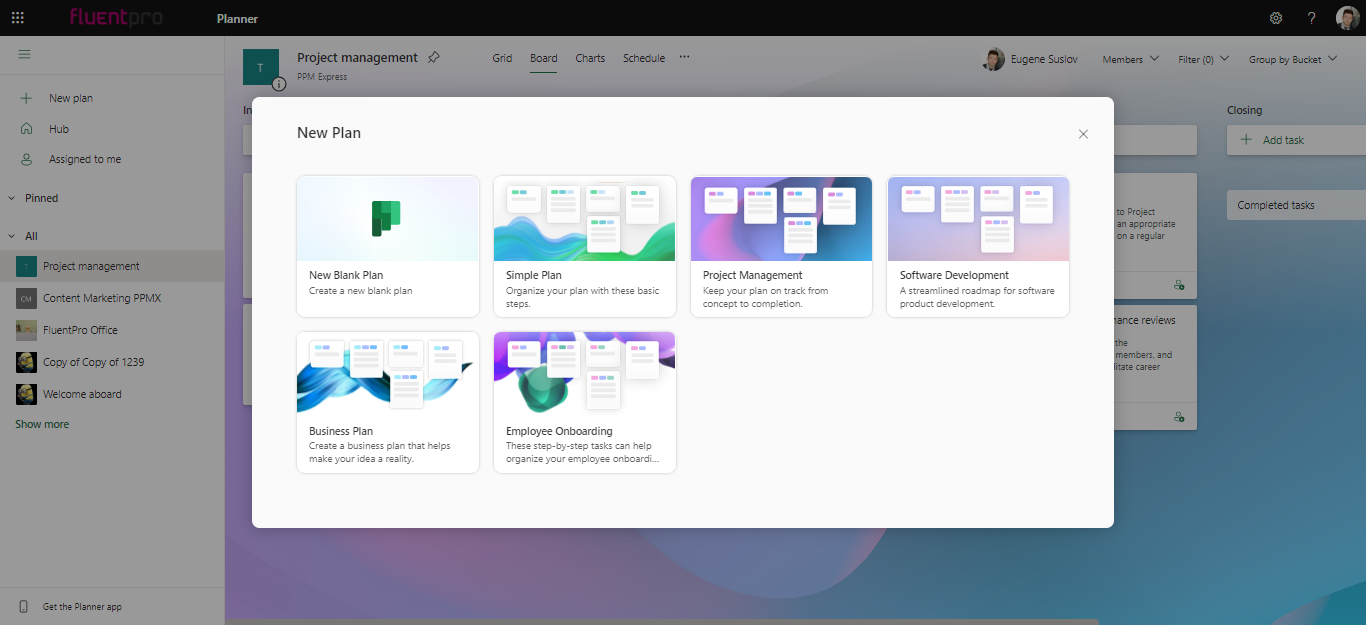
- Review your MS Project Online projects for compatibility with Microsoft Planner, considering size, complexity, and utilized features like Gantt charts.
- In Planner, create a new plan with a suitable name and adjust privacy or sharing settings. Identify tasks and their hierarchy in Planner, matching them accurately to your Microsoft Project Online projects.
- Export data from Project Online as an Excel file and prepare the file by formatting tasks and data in a table format, with one row per task. Next, store the Excel file in SharePoint or OneDrive.
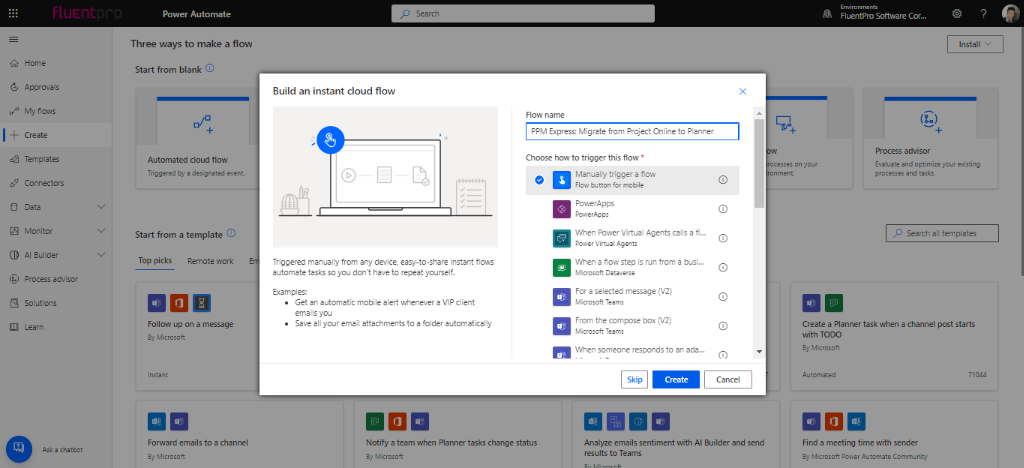
The hardest part – you need to build the Power Automate flow:

- Start with the manual trigger – an “Instant cloud flow”. Add its name and choose trigger “Manually trigger a flow” to activate flow with Power Automate mobile app. You also can choose from scheduled or automated triggers.
- Use the “List rows present in a table” action to retrieve all rows from the Excel file. Select the file location, name, and table with tasks using the provided buttons.
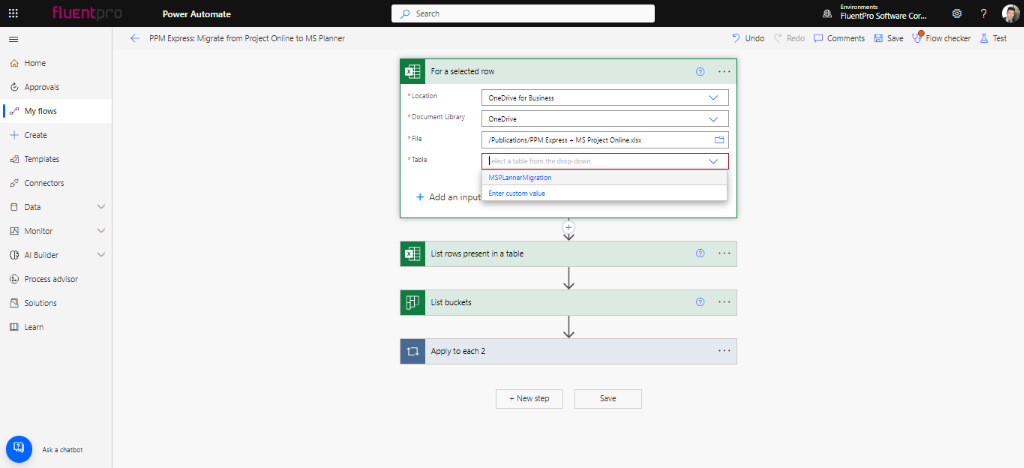
- After that, use the “List buckets” action to retrieve all buckets from MS Planner, selecting Group ID and Plan ID.
- Create a sequence of actions using "Apply to each" to check the equation between Excel and MS Planner values. Use a "Condition" action to sync each value from Excel to MS Planner.
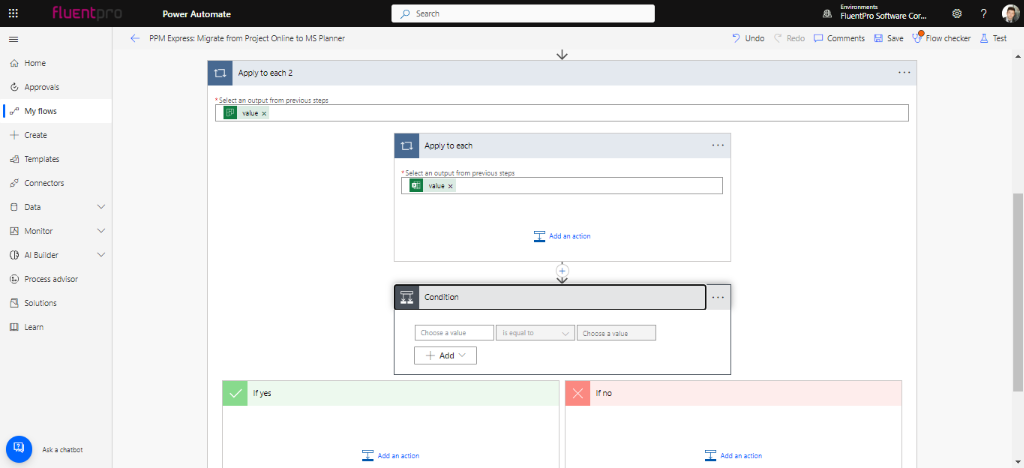
- You can use three options: “Create a task in MS Planner”, “Update a task in MS Planner,” and “Update task details”. Leave the task unchanged if your condition is not met.
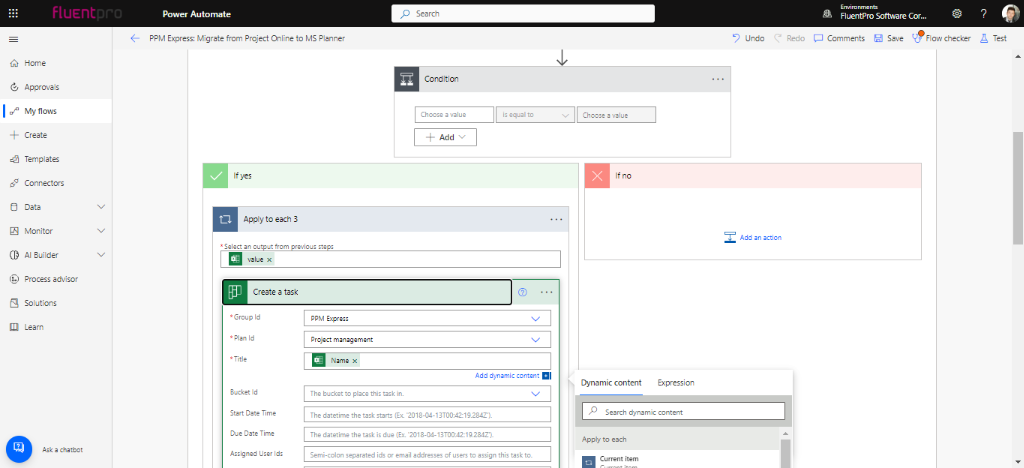
- Repeat this sequence for each field (value) you want to import to MS Planner from Excel.
- Start the flow. Don’t forget to use "Flow check" and "Test" to ensure the sequence works properly.
Using Power Automate for the migration process can be overwhelming due to the complexity of building and managing the automation flow.
However, you can use a solution that simplifies the migration process and allows you to leverage the benefits of both Project Online and Microsoft Planner – PPM Express.
This offers seamless integration with both software solutions, enabling you to view and interact with your project data effortlessly while maintaining a unified view of your projects.
Another alternative is migrating to Microsoft Project for the web, which provides a comprehensive web-based project management solution.
Method 4: Migrating to Microsoft Project for the web
Migrating from Project Online to Microsoft Project for the web allows you to continue managing your projects (and building portfolio management) within the Microsoft ecosystem.
Follow these actionable instructions to migrate your project data to Microsoft Project for the web:
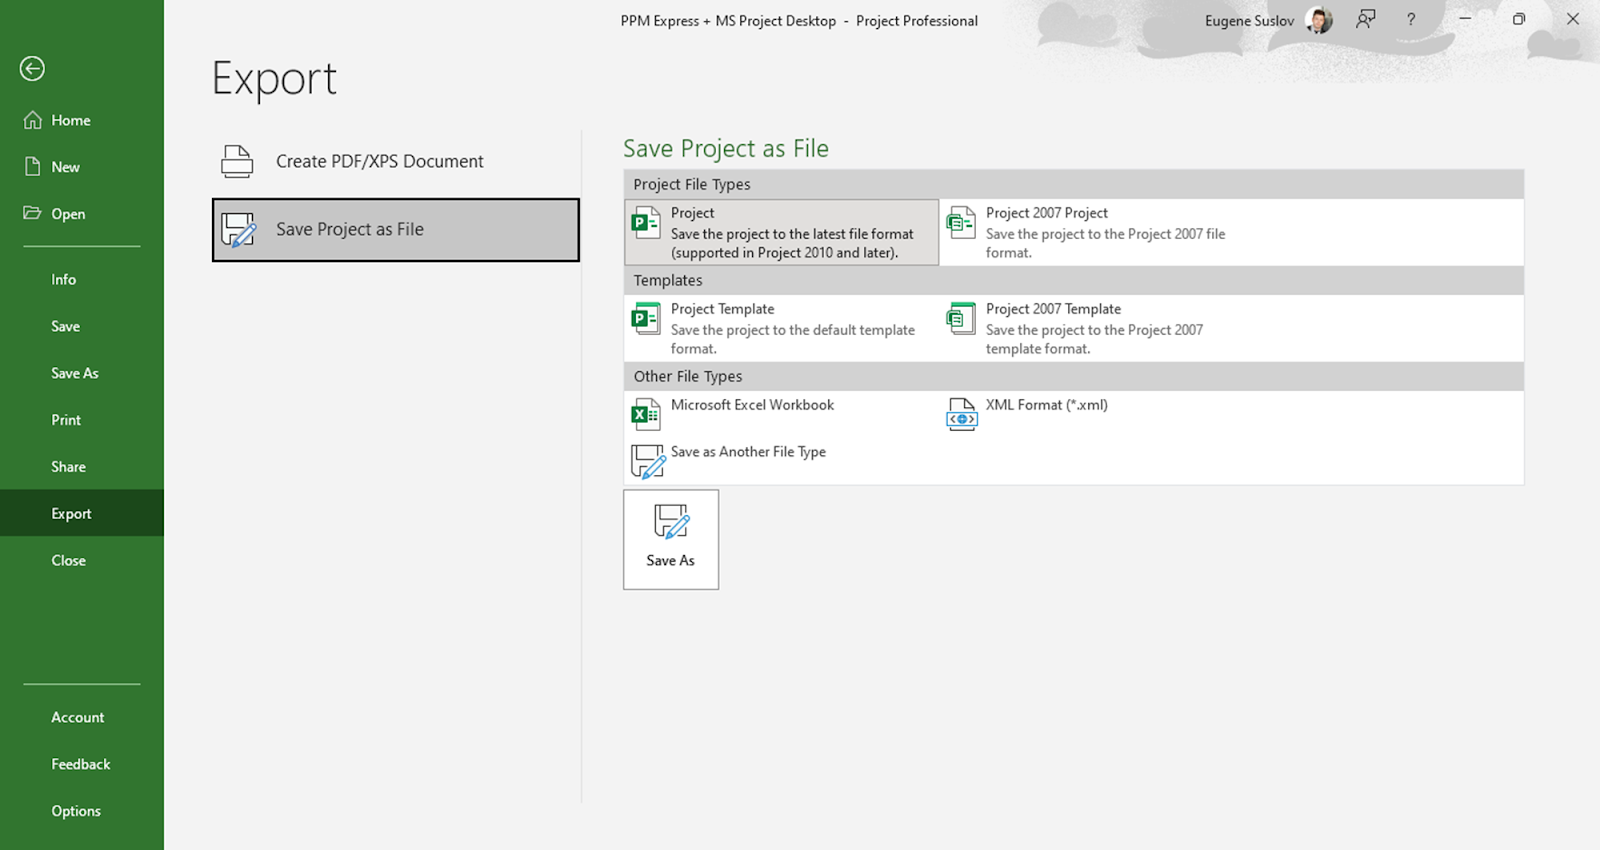
- Connect your Project Online with the Project Desktop client (the step-by-step guide we provided in this article as a Method 2) and import the required projects.
- Choose the project you wish to export from the list of available projects. Click “File” → “Export” → “Save Project as File” → “Choose MPP extension”.
- In Microsoft Project for the web, create a new project by clicking “+ New Project” where you want to import your MS Project Online data. Use the "Import project" option within Microsoft Project for the web's interface.
- Browse and select the MPP file you want to import, then click “Open”.
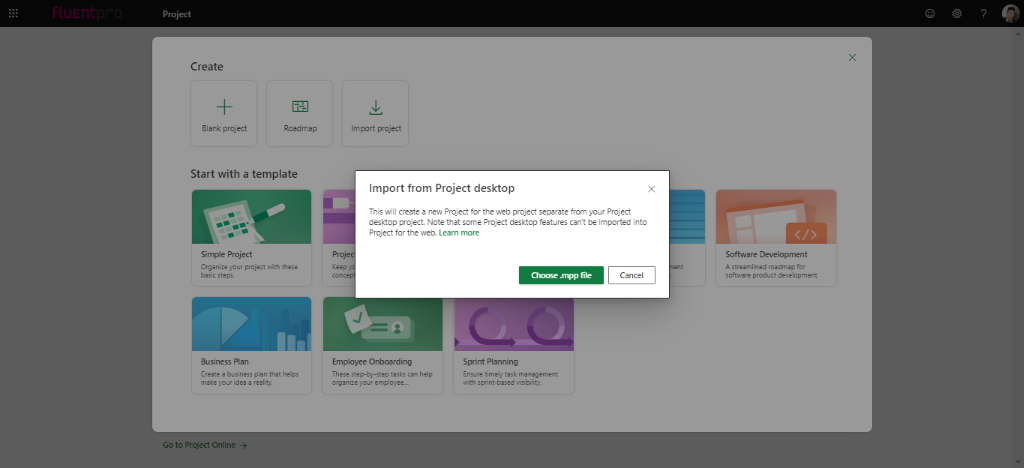
- In the “Import custom fields” dialog box, choose up to 10 custom fields to import into your Project for the web project and click “Done”.
- Review the changes, then click “OK” to start working on your project in Project for the web.
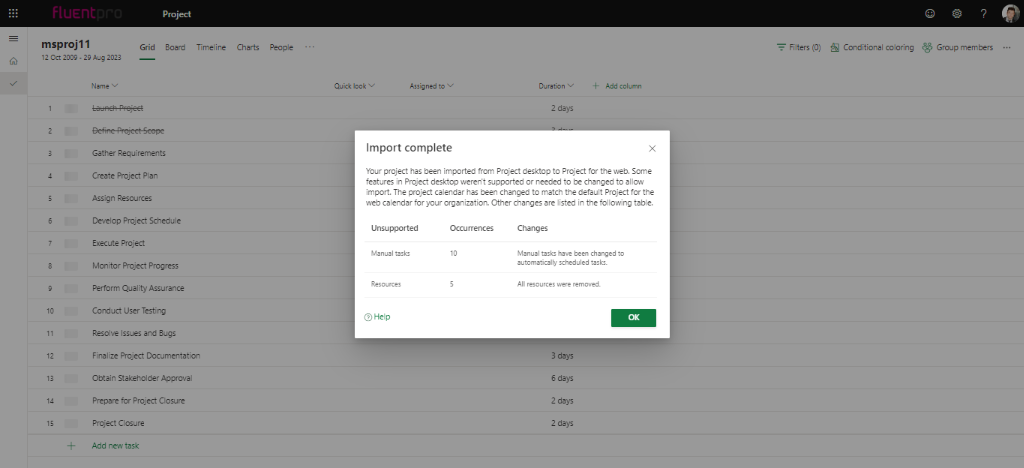
- After completing the import process, review the imported project in Microsoft Project for the web. Ensure that the project data, task relationships, resources, and other elements have been accurately transferred from MS Project Online. Make any necessary adjustments or refinements to align the project with your requirements.
Congratulations! You have successfully migrated your project data from Project Online to Microsoft Project for the web. Now you can use all of its low-code benefits in your project management.
Furthermore, you can utilize PPM Express to effectively leverage the benefits of both Project Online and Project for the web concurrently, allowing you to optimize your project management capabilities.
After considering the native Project Online migration options, you may decide they don't meet your requirements. So let’s explore the available third-party Microsoft Project Online migration options.
Available third-party MS Project Online migration options
In addition to Microsoft's native migration options, third-party migration solutions provide enhanced features, customization, and flexibility.
These tools offer specialized functionalities and comprehensive support to streamline the migration process and ensure a smooth transition to your desired project management platform.
Let's explore the available third-party Project Online migration options.
Method 5: Using migration tools like Project Migrator by FluentPro
Using third-party migration tools is a popular approach to migrating from MS Project Online, as these tools offer advanced functionalities and streamlined processes.
Follow these instructions to migrate your projects using migration tools like Project Migrator by FluentPro:
- Connect the migration tool to Microsoft Project Online and Project for the web, providing the necessary credentials and permissions. Use the helpdesk to explore the details.
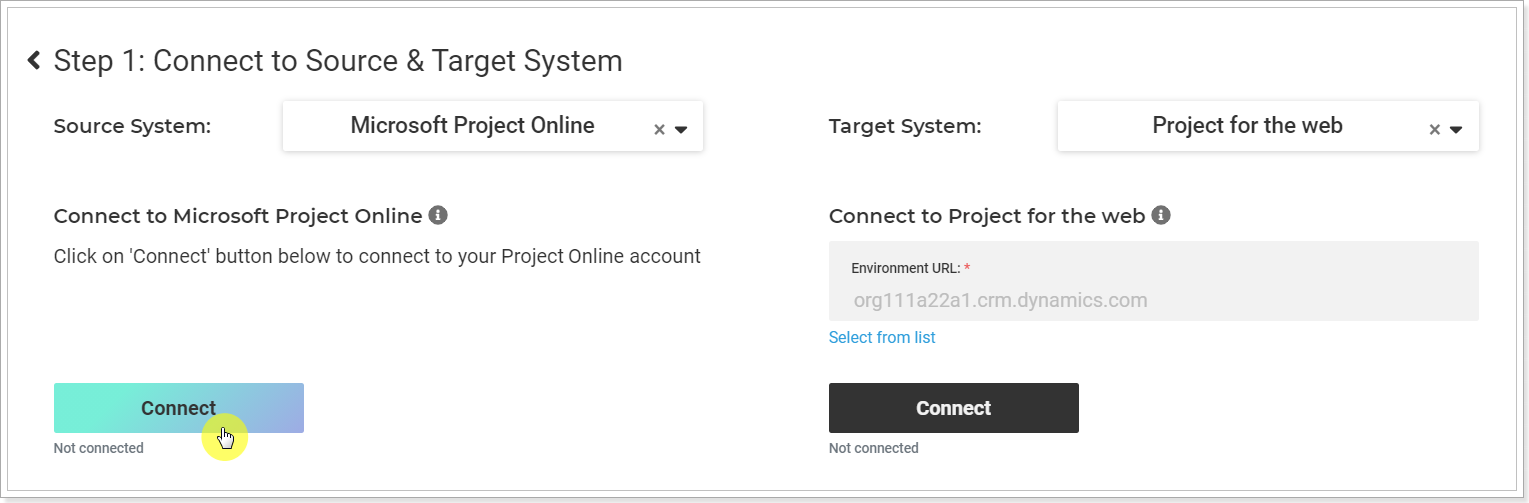
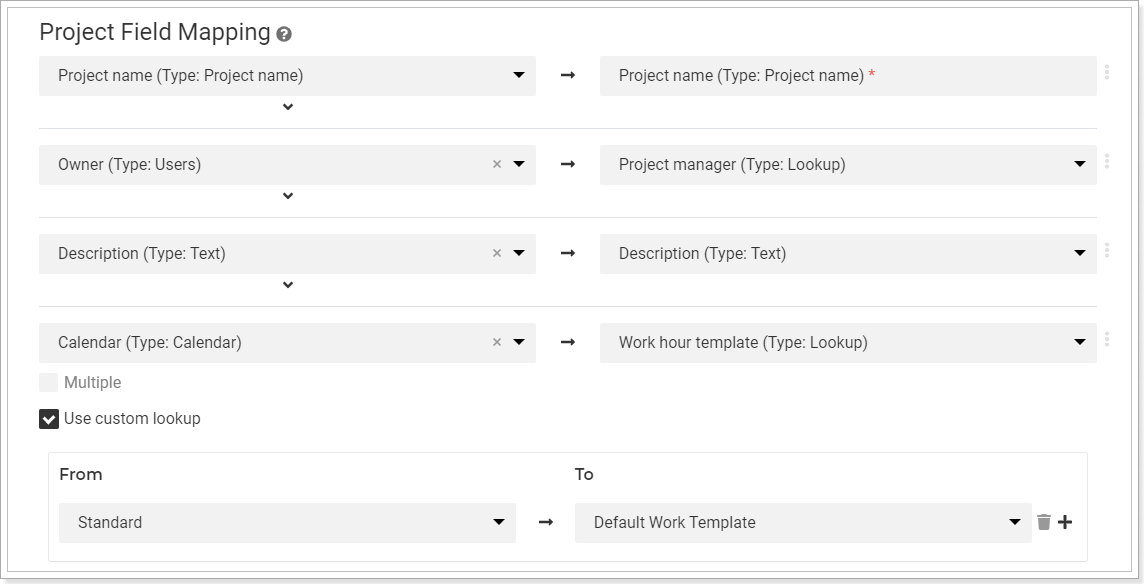
- Configure migration settings, including project selection, data mappings, and project-specific rules.
- Initiate the migration process as instructed by the migration tool. Monitor the migration progress, reviewing status updates provided by the tool.
- Verify the migrated data in your Project for the web environment, ensuring accuracy and completeness.
Congratulations! You have successfully migrated your projects from MS Project Online using a third-party migration tool.
After exploring the option of using migration tools for seamless data transfer, another approach to consider is migration to third-party project management software like Jira to facilitate a smooth transition and ongoing synchronization of project data.
Method 6: Migration to project management software like Jira
Integrating Project Online with third-party project management software provides another effective option for migrating your projects.
Follow these actionable instructions to integrate Microsoft Project Online with project management software – for example, Jira:
- Export data from Project Online as an Excel file as discussed in Method 1 in native migration strategies.
- Open the Excel file and save it as a CSV file.
- Prepare your CSV file by ensuring it follows these requirements: fields must be separated by commas; any content with special characters or spanning multiple lines should be enclosed in quotation marks; the header row must contain a "Summary" column; commas cannot be omitted as field separators.
- Run the CSV file import wizard in Jira using the following steps:
- Log in to Jira as a user with the Jira administrator's global permission.
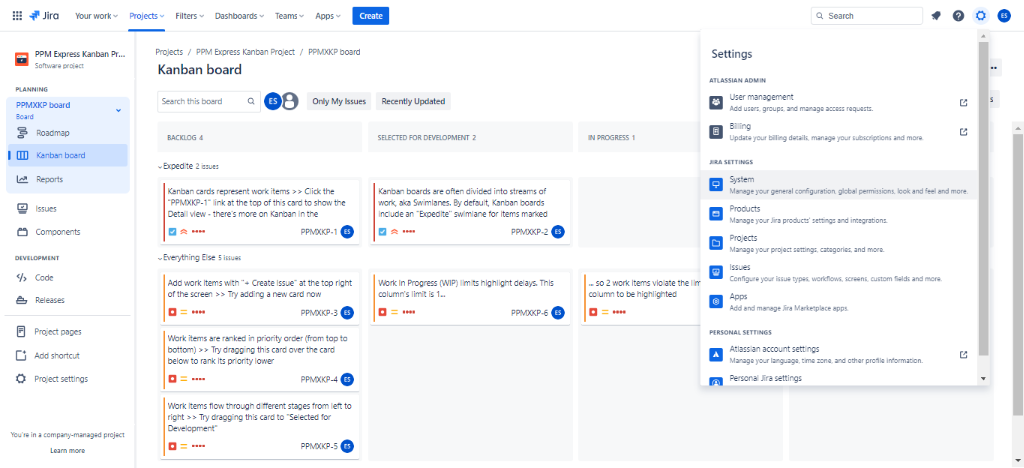
- Go to “Administration” → “System” → “External system import”.
- Select “CSV” and choose your CSV source file. Set the file encoding and delimiter format if needed.
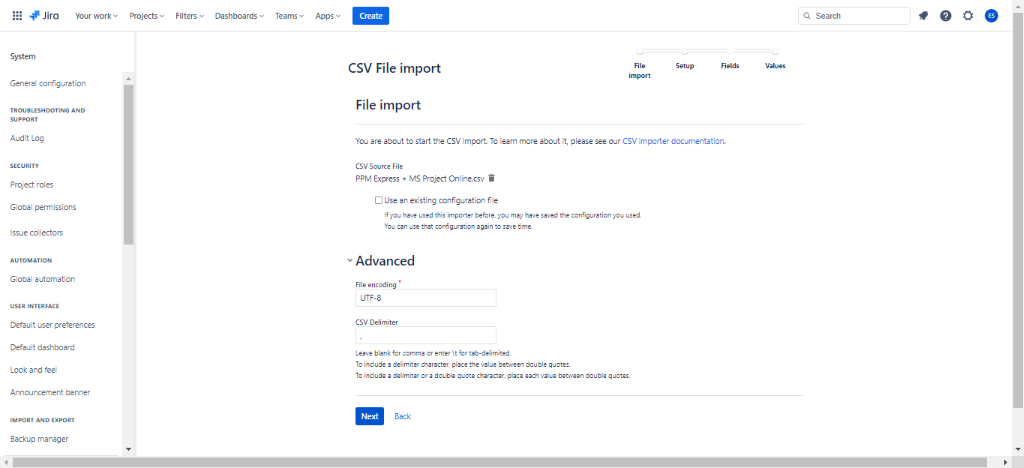
- Select “Next” and set up project mappings, including project name, project key, and project lead. Map fields in the CSV file to Jira fields in the selected project. Specify Jira field values for each CSV file field value.

- Select “Begin Import” to start importing your CSV data into Jira.
Note: non-administrative users can follow similar steps for a bulk issues import under “Issues” → “Import issues from CSV”.
- Once the integration is complete, verify the transferred data in your target project management software. Review project structures, task details, resource assignments, and other relevant data to ensure a successful integration.
Congratulations! You have successfully integrated MS Project Online with your Jira platform.
Most project management platforms employ similar methods to integrate data from external systems like Project Online, making our instructions applicable beyond just the Jira case.
After exploring migrating to project management software like Jira, another alternative to consider is implementing custom API solutions to tailor the migration process according to specific requirements.
Method 7: Custom API solutions
For organizations with specific migration requirements or complex data transformations, leveraging custom API solutions can provide a tailored approach to migrating projects from MS Project Online.
Follow these actionable instructions to utilize custom API solutions for your migration:
- Assess migration requirements: evaluate needs, data elements, and transformations. Determine if a custom API solution is necessary.
- Engage experts: collaborate with authorized developers to define the scope and functionalities of the custom API solution.
- Identify APIs: familiarize yourself with Microsoft Project Online and target platform APIs for data transfer and synchronization.
- Design data mapping: work with the development team to map and transform data from MS Project Online to the target platform.
- Develop the custom API solution: utilize APIs to build the solution for data retrieval, transformation, and synchronization.
- Test and debug: thoroughly test and debug the custom API solution to ensure functionality and accuracy.
- Execute the migration: monitor data transfer and address any issues during the migration process.
- Validate migrated data: review project structures and details in the target platform to ensure a successful migration.
Congratulations! You have successfully utilized a custom API solution for migrating your projects from Microsoft Project Online.
Alternatively, you might prefer a more comprehensive and streamlined approach. In that case, you can explore using third-party platforms like PPM Express, which offers powerful integration capabilities to simplify your project management and data migration processes.
Method 8: Using project portfolio management platforms like PPM Express
Project portfolio management platforms offer comprehensive third-party integration solutions tailored for organizations using MS Project Online.
These platforms provide advanced project management features, seamless integration capabilities, and enhanced collaboration functionalities.
One of the key advantages of using project portfolio management platforms like PPM Express is their platform-agnostic nature.
This means that while migrating to meet specific organizational needs, teams can seamlessly transition to using new tools altogether. This not only saves time and money but also allows for the expansion of capabilities across different systems.
Follow these actionable instructions to migrate your projects using project portfolio management platforms like PPM Express:
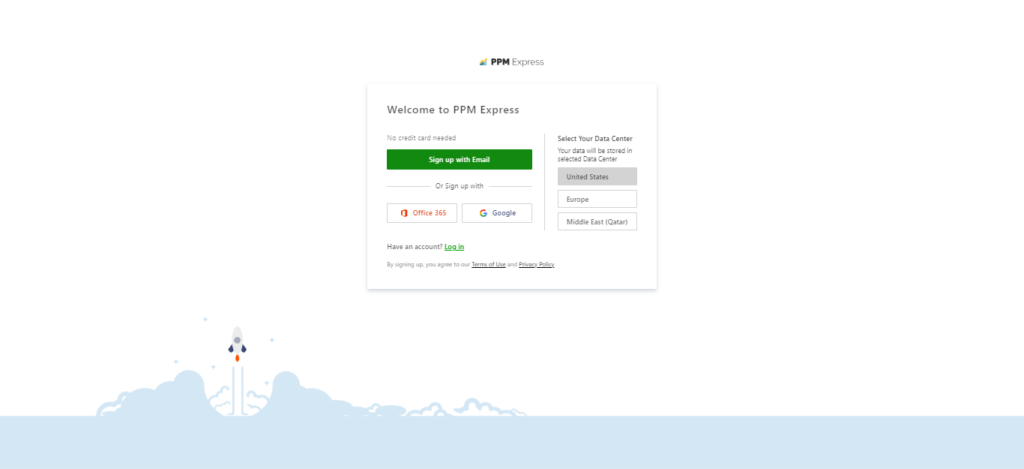
- Visit the PPM Express website and log in to your profile (or book a trial to create a new one).
- Once your PPM Express account is set up, establish a connection between PPM Express and your Microsoft Project Online environment.
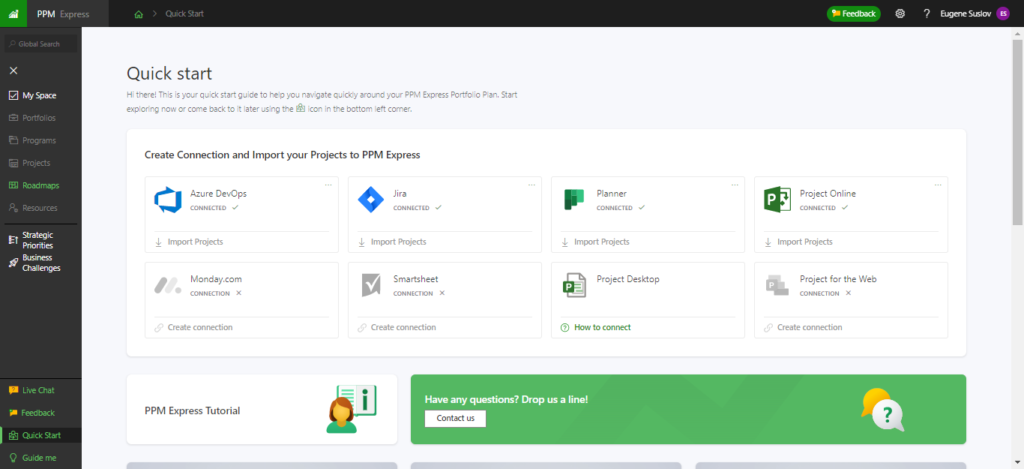
- Set the parameters specific to your integration needs, such as selecting projects you want to integrate, mapping fields, and specifying data validation requirements.
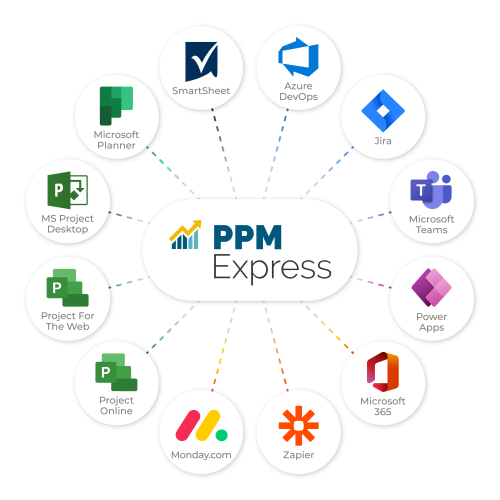
As a result, instead of going through the migration process, you can seamlessly integrate MS Project Online with MS Project Desktop, Project for the web, Microsoft Planner, and other systems like Azure DevOps, Jira, monday.com, or Smartsheet.
This allows you to leverage the strengths of these platforms while still using Project Online:
- Use MS Project Desktop to seamlessly integrate project management and planning workflows, leveraging its comprehensive features within MS Project Online.
- Embrace Project for the web to enhance project planning and execution, combining its intuitive features and collaboration tools with Microsoft Project Online.
- Leverage MS Planner to streamline project management and team collaboration, utilizing its visual boards, task tracking, and communication features with Project Online's robust planning capabilities.
Now that we've explored the available third-party MS Project Online migration options let's move on to some small tips from Microsoft to make your migration process even easier.
Microsoft Project Online migration: small tips to make it easy
Migrating from Project Online to a new project management solution can be complex.
However, you can ensure a smooth and successful migration with proper planning, testing, and attention to data security and training.
Consider the following small tips to make your MS Project Online migration easier:
Planning and preparing for migration
Planning and preparation are crucial for a successful migration. Take the following steps to ensure a smooth transition:
- Assess project management needs: define your requirements and integration capabilities.
- Develop a migration plan: create a detailed plan with timelines and assigned responsibilities.
- Evaluate data quality: review and clean up project data in Microsoft Project Online.
Once the migration plan is in place, move on to the testing and verification phase.
Testing and verification
Thorough testing and verification are essential to ensure a successful migration. Consider the following tips:
- Perform test migrations: conduct trial migrations with a subset of data to address issues.
- Validate migrated data: thoroughly review and validate transferred data in the new solution.
After the migration is complete, focus on ensuring data security and privacy.
Data security and privacy
Maintaining data security and privacy throughout the migration process is of utmost importance. Follow these tips:
- Encrypt data during transfer: use secure protocols like HTTPS or SFTP for protected migration.
- Implement access controls: restrict access to sensitive data by setting up appropriate permissions in the new solution.
With data protection measures in place, it's time to provide training and transition support for a smooth adoption of the new system.
Training and transition support
Training and transition support for your team is vital for smoothly adopting the new project management solution. Consider these tips:
- Conduct training sessions: train your team on the new solution's features and functionalities.
- Offer transition support: provide ongoing assistance and resources to address any concerns.
By following these small tips for Microsoft Project Online migration, you can easily transition to a new project management system and maximize its potential for effective project management.
Maximizing project management potential after Project Online migration
Migrating from MS Project Online to a new project management solution opens opportunities to enhance your organization's project management potential.
Here are some key considerations for maximizing your project management potential after the migration:
- Utilize advanced features for streamlined processes, improved collaboration, and enhanced project visibility
- Customize workflows, fields, templates, and reports to match your organization's project management requirements
- Promote collaboration through transparent communication, file sharing, and real-time updates for increased teamwork and productivity
- Monitor project and portfolio performance using reporting and analytics to identify areas for improvement
- Provide ongoing training and education to ensure proficiency in using the project management solution and stay updated on new features and best practices
Whether you choose a native migration option or leverage third-party tools, the key is to embrace the change and explore the full potential of your new project management solution.
But if you're looking for a comprehensive project portfolio management solution to not only migrate from MS Project Online but also gain a big-picture view of your projects by integrating them, consider PPM Express.
With its advanced features, seamless integration capabilities, and intuitive interface, PPM Express offers a robust platform to manage and visualize your projects.
Try PPM Express today to maximize your portfolio project management potential.