In the past four years, a significant 62% of organizations have encountered critical risk events that posed potential harm to their operations.
As portfolio managers strive to deliver projects on time and within budget, they need a comprehensive solution to proactively identify, assess, and mitigate these risk events.
This is where Jira comes in.
To determine how risks can be mitigated, we will explore effective strategies for leveraging Jira in risk and issue management, including identifying, prioritizing, and tracking risks at project level.
Next, we will provide you with a plan that streamlines issue management within Jira.
Lastly, we’ll discover how third-party solutions like PPM Express enhance Jira for superior project and portfolio management, maximizing success without workaround.
Join us as we explore some tips and strategies for utilizing Jira to its full potential in managing project risks and issues.
Table of contents
- The crucial role of risk and issue management in project success
- A simple strategy for managing risks and issues with Jira
- Leveraging third-party solutions for next-level risk and issue management in Jira
- Maximizing Jira's capabilities for managing project risks and issues
The crucial role of risk and issue management in project success
Effective project management with risk evaluation is essential to the success of any project.
Unfortunately, boards and senior executives typically spend only a small portion, around 9%, of their meeting time on risk management.
While many factors can impact project success and define its failure, one of the most important is managing two entities:
- Risks: potential events or circumstances that could hurt the project.
- Issues: problems that have already occurred and need resolution.
There are several reasons why conducting effective risk and issue management is crucial for project success:
- Proactive identification and mitigation: addressing risks and issues early prevents them from escalating and impacting project outcomes.
- Improved decision-making: a structured risk and issue management process enables informed decisions and effective allocation of resources.
- Enhanced stakeholder communication: transparently discussing risks and issues maintains stakeholder trust and manages expectations.
- Efficient resource allocation: identifying risks and issues helps allocate resources effectively, avoiding wasted efforts.
- Continuous monitoring and adaptation: regular monitoring allows a prompt response to challenges, ensuring project success.
Now that we understand the crucial role of risk and issue management in project success, let's explore a simple strategy for managing risks and issues using Jira.
A simple strategy for managing risks and issues with Jira
When it comes to managing risks and issues in projects, portfolio managers need effective tools to get an overview of all the risks that could influence a project portfolio.
This section will explore practical strategies for leveraging Jira to manage risks and issues efficiently.
Read on to discover insights that will help you to mitigate the risks with Jira.
Creating a separate Jira project and issue type for risks
Creating a dedicated project and issue type for risks can help portfolio managers effectively track and manage potential risks within Jira.
By doing that, portfolio managers can easily identify and prioritize risks, assign ownership and track mitigation efforts, and generate reports on risk trends and patterns.
To create a Jira project for risks, portfolio managers can follow these steps:
- Go to “Projects” and click “Create project” in the navigation.
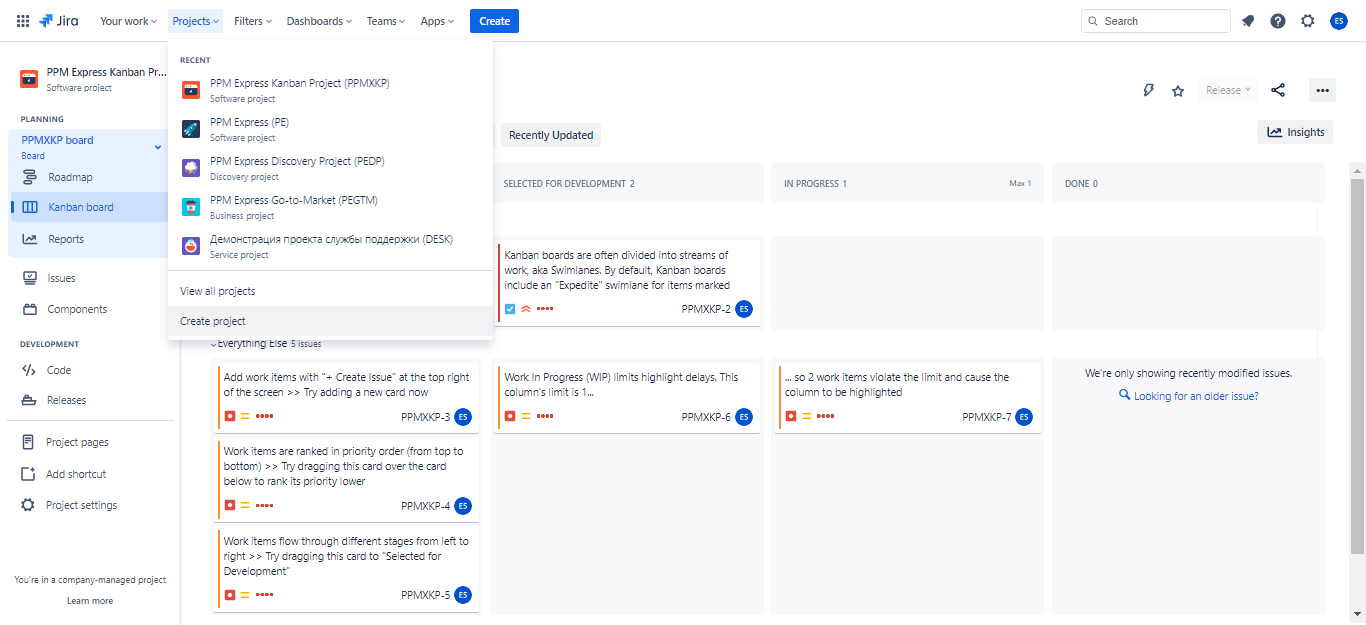
- Choose a category or product from the templates based on your use case.
- Select a specific template and click on “Use template”. Choose the project type: company-managed or team-managed.
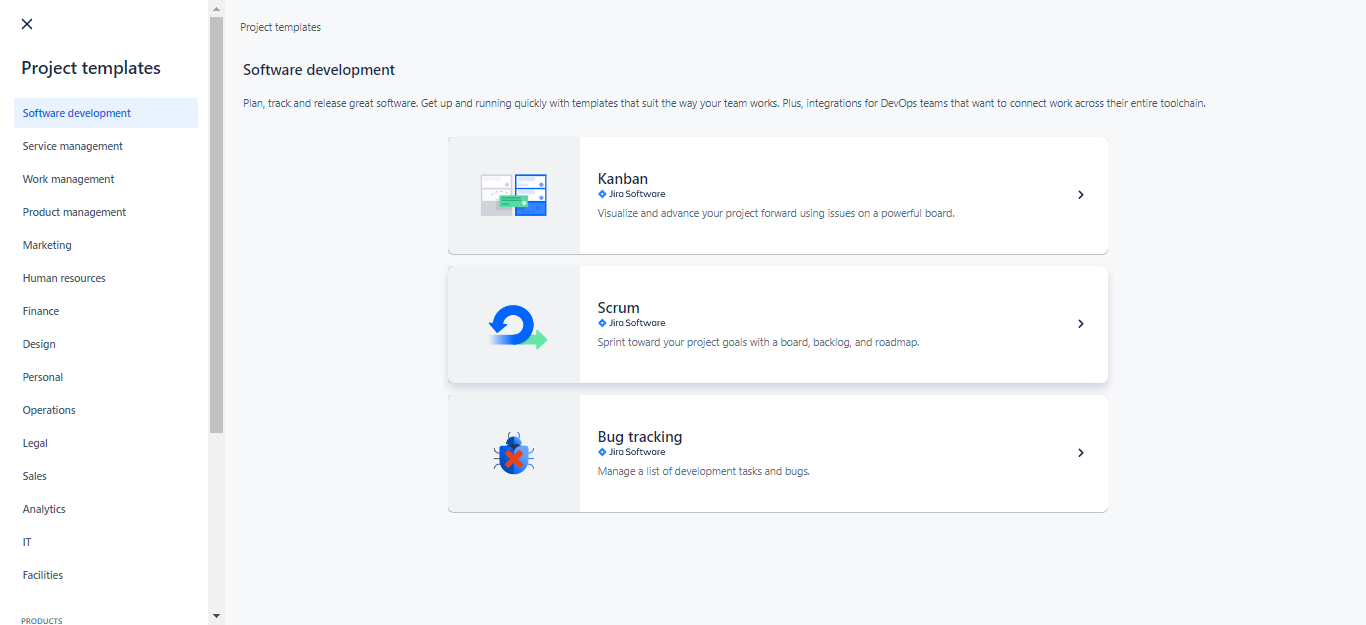
- Provide a recommended “Risk Management” name for your project, and if necessary, change the service project template.
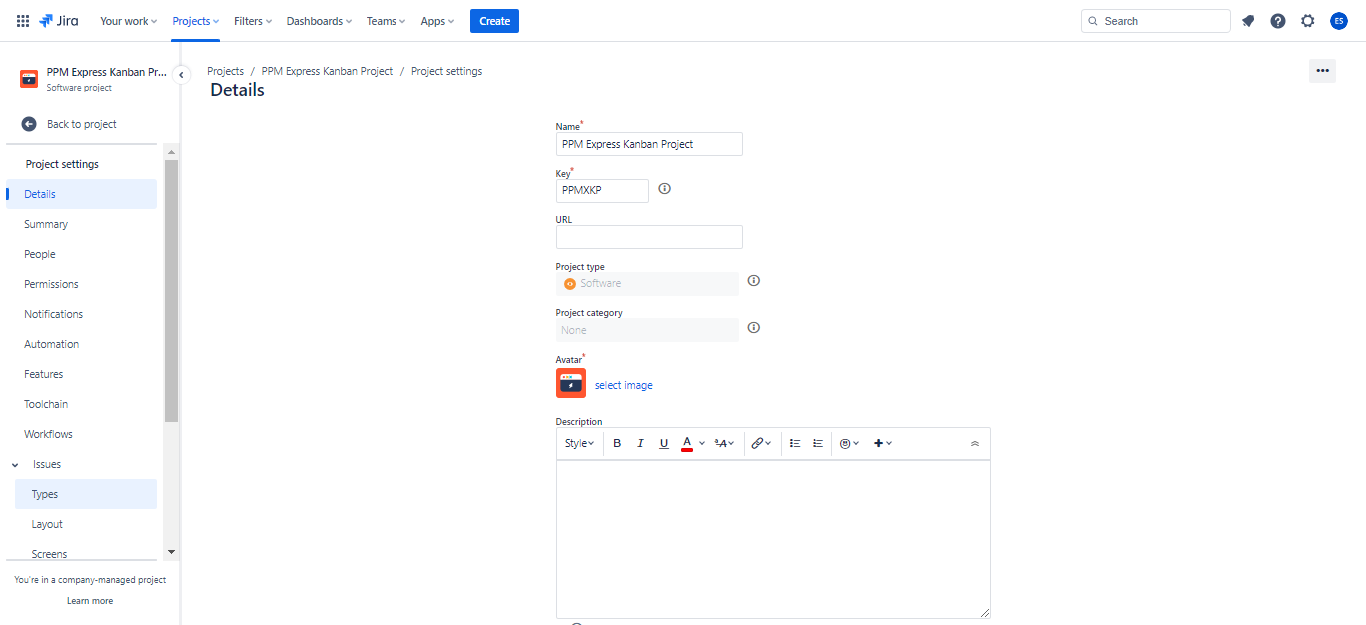
- Click “Create” to generate the project with an automatic key assigned. By default, the project creator is set as the project lead.
Set up the project's issue type scheme, workflow scheme, and notification scheme based on the organization's needs. To create a Jira issue type for risks, portfolio managers can follow these steps:
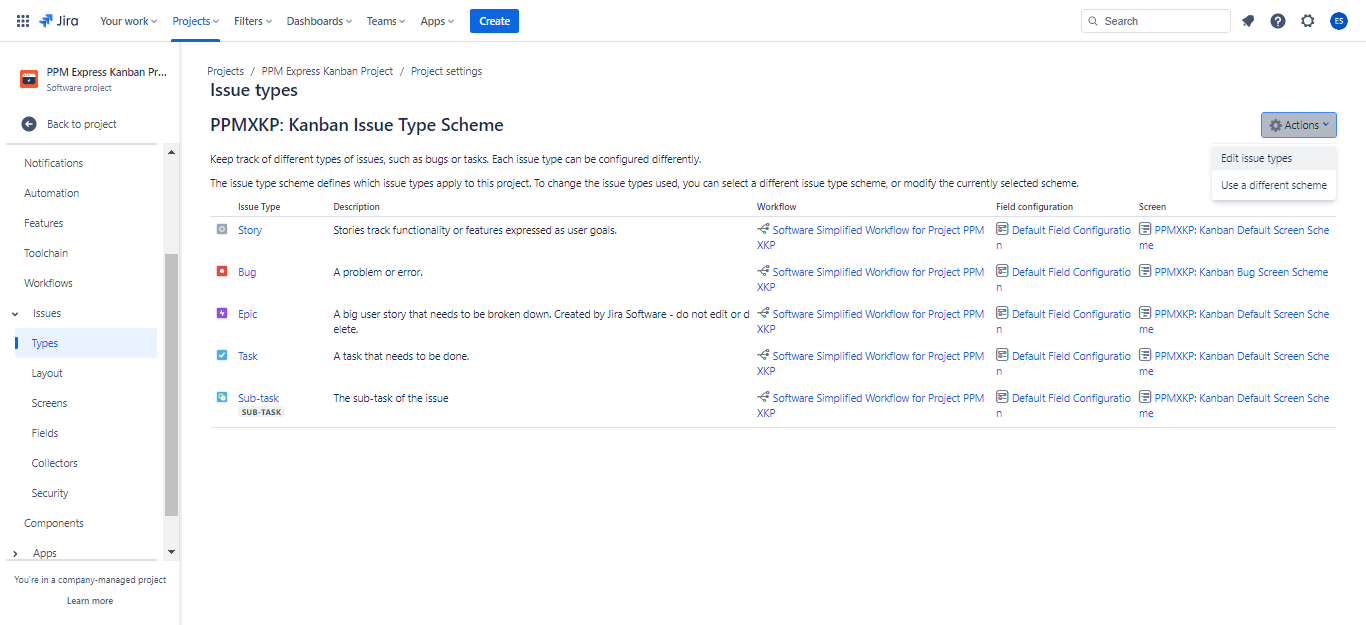
- Go to “Issues” in the “Project Settings” navigation menu.
- In the left column, navigate to “Issue types”. Then, on the right, choose the dropdown menu “Actions” and click “Edit issue types”. Press “Add issue type” to add a new one.
- Provide a name and description for the new issue type.

- Choose between a standard issue type or a sub-task issue type.
- Standard issue types such as Initiative and Legend are positioned above the Epic level.
- Sub-task issue types are located below the Story level, alongside subtasks.
- Click on “Add” to create the new issue type.
Once you have set up a separate Jira project and issue type designed explicitly for risks, the next step is to effectively capture and prioritize those risks within Jira.
Capturing and prioritizing risks in Jira
Capturing and prioritizing risks is the next critical step in effective risk management, and Jira offers a range of tools and features to help portfolio managers achieve this.
By using Jira to capture and prioritize risks, portfolio managers can ensure that potential risks are identified and addressed promptly and efficiently.
After creating a dedicated project and issue type for risks, as described earlier, portfolio managers can create issues custom fields by following these steps to structure data about your risks and – based on it – capture and prioritize risks in Jira.
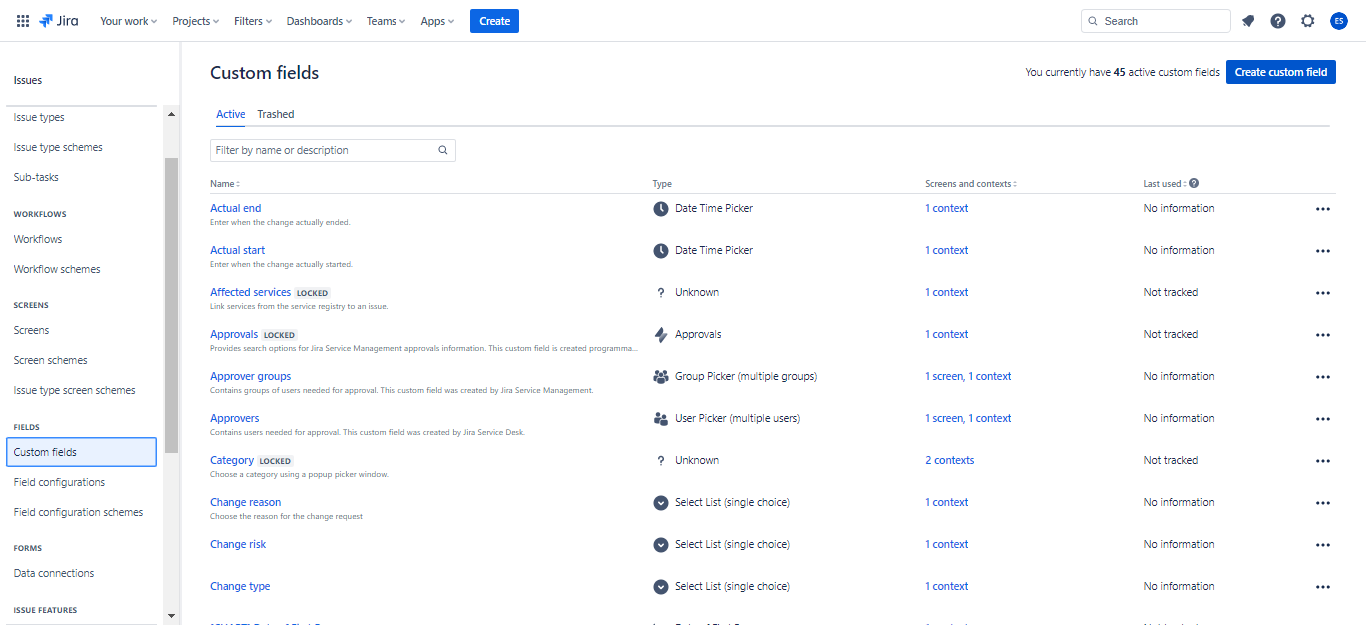
- In the “Settings” menu, go to “Issues” → “Custom fields”.
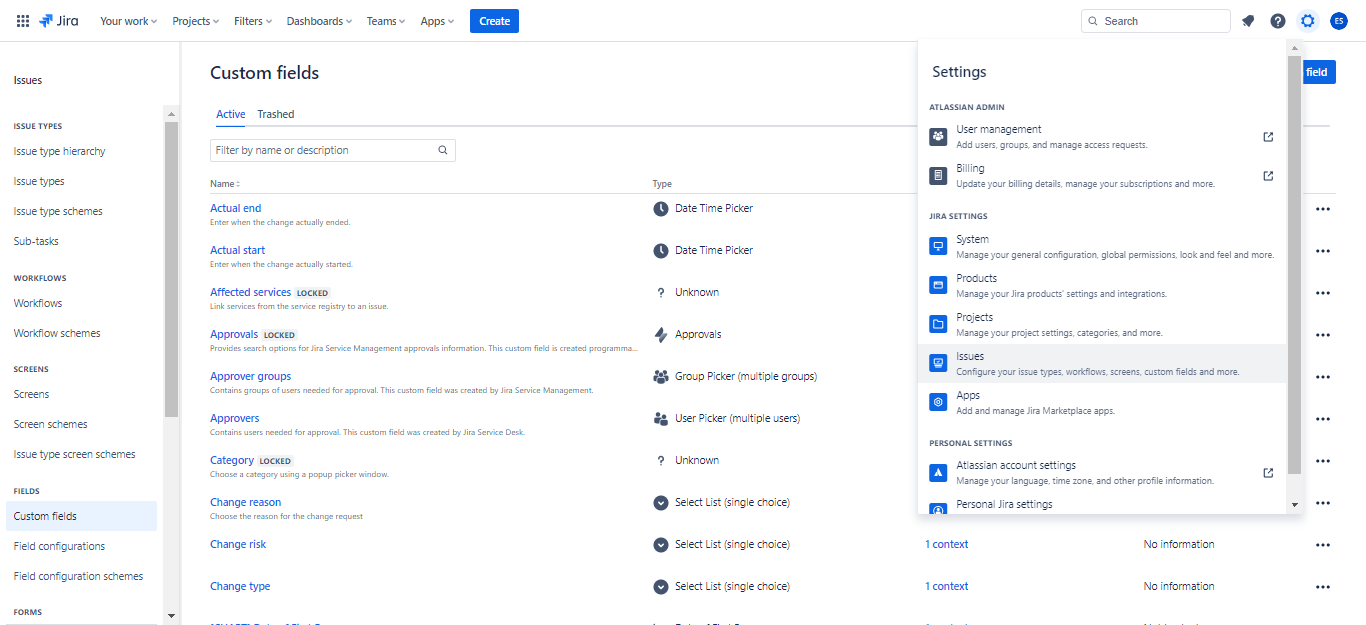
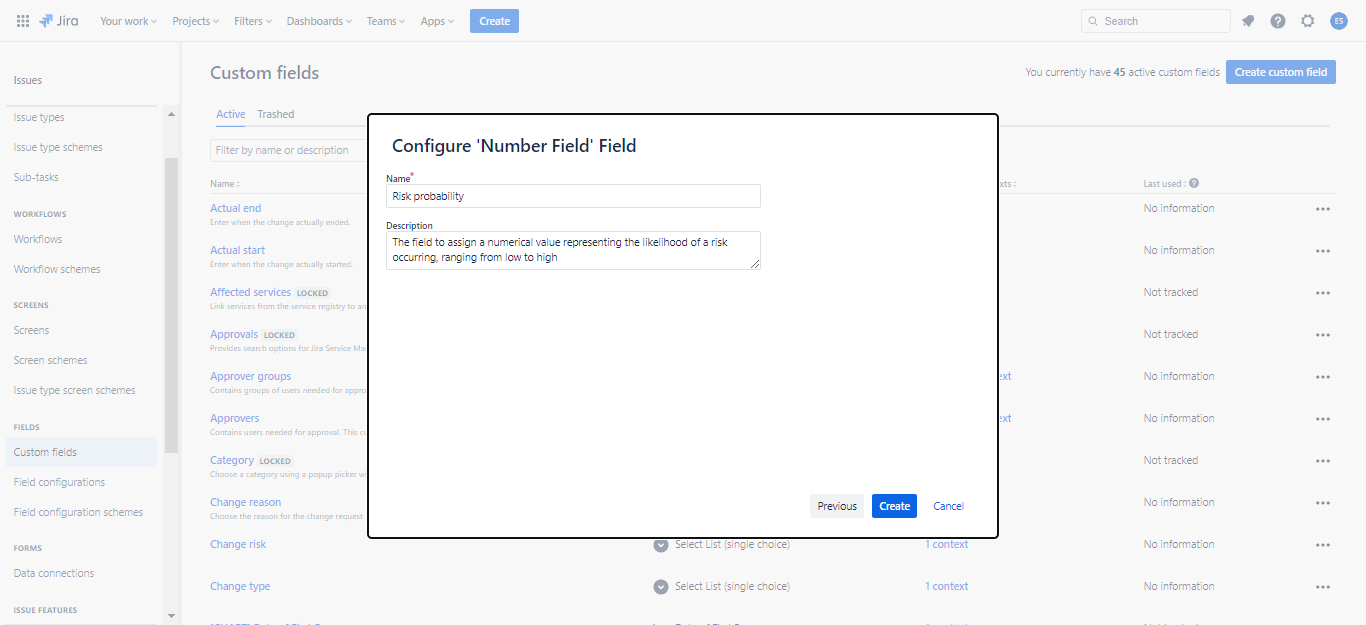
- Click “Create custom field” and select the desired field type. Provide the field details, including name and description. Click “Create” to finish.
To effectively capture and prioritize risks in Jira, portfolio managers should consider creating the following custom fields in Jira issues (here are the types of custom files we recommend using):
- Risk category (Single select): a field to categorize risks into specific types or categories, such as “Technical”, “Financial”, or “Operational”.
- Risk probability (Number field): a field to assign a numerical value representing the likelihood of a risk occurring, ranging from low to high.
- Risk impact (Number field): a field to assign a numerical value representing a risk's potential impact or severity, ranging from low to high.
- Risk mitigation plan (Text field): a field to document the specific actions or strategies to mitigate or address the identified risk.
- Risk owner (User Picker): a field to assign a responsible individual or team to manage and monitor the risk.
- Risk priority (Single select): a field to prioritize risks based on their overall significance or urgency, such as “High”, “Medium”, or “Low”.
- After creating a custom field, you'll be directed to the “Screens” page. Select the issue screens where you want the custom field to appear, such as the “Default Screen” or “Resolve issue screen”.
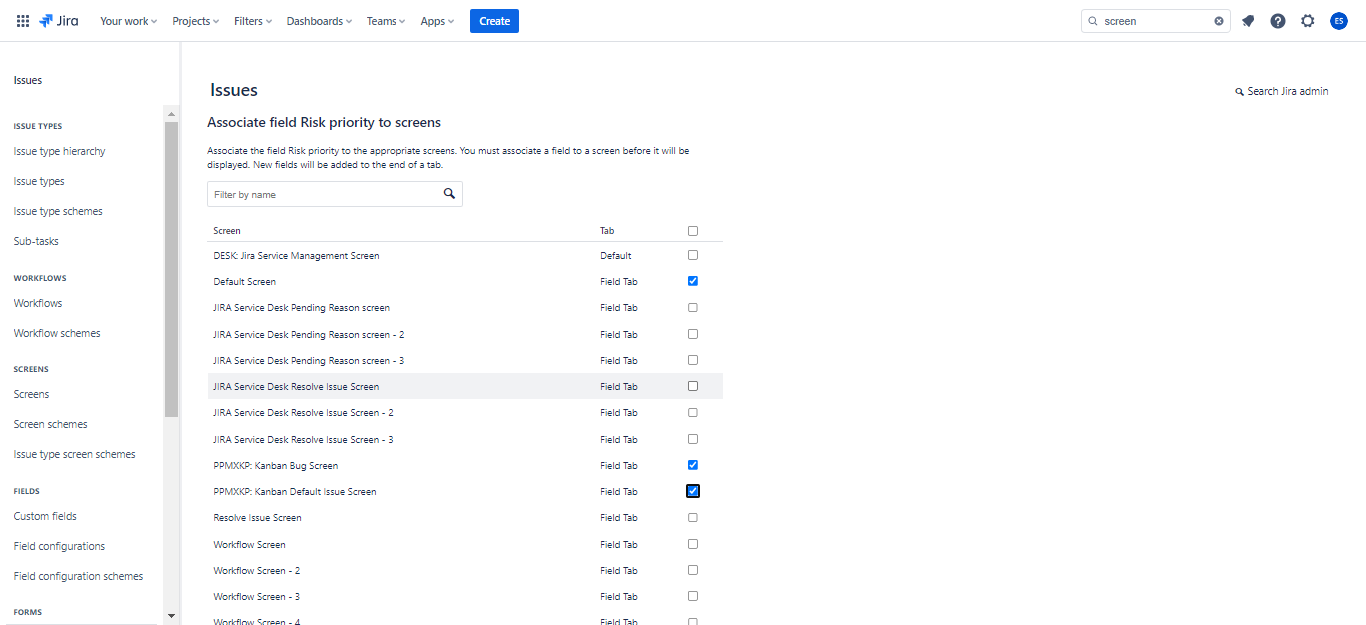
- Check the checkboxes next to the desired screens and click “Update” to associate the field with the selected screens.
You can also associate a custom field with the issue layout:
- To add the custom field to screens, go to the left sidebar “Project settings” → “Issues” → “Layout” from the project's sidebar.

- Locate the desired issue type(s) and click on the “Edit” issue layout. This displays the configured screen layout for the project.
- Drag and drop fields to move them to different sections. Fields in the hidden section won't be visible in the issue view but will remain connected to the issue type(s).
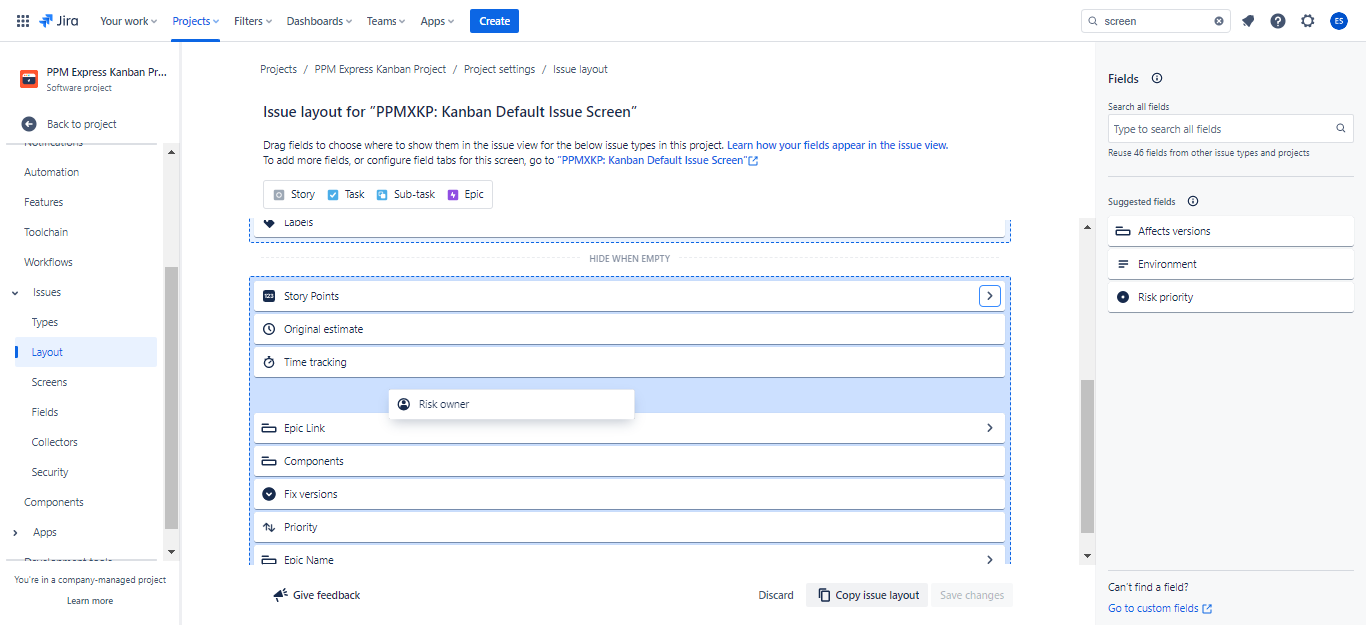
- Select “Save changes” to apply the updated issue layout.
Additionally, Jira users can leverage the powerful features of PPM Express to gain a comprehensive view of their risks.
Unlike Jira's lack of standalone risk management, PPM Express offers a dedicated section to track risks for specific projects or project parts from Jira, allowing project managers to connect epics, initiatives, or entire Jira projects.
Furthermore, PPM Express enables portfolio managers to elevate risks from project to program/portfolio levels, providing a comprehensive view of all risks across multiple projects.
With PPM Express reporting capabilities, users can conveniently access and filter risks from various projects, programs, and portfolios in one central location.
Once risks have been effectively captured and prioritized within Jira, the next crucial step is to assign appropriate risk owners.
Assigning risk owners in Jira
Assigning ownership of risks is a critical step in effective risk management.
By assigning ownership of risks in Jira, portfolio managers can ensure that the appropriate team members monitor and address potential risks.
To assign risk owners in Jira, portfolio managers can follow these steps:
- When a risk is identified, assign it to a team member using the designated “Risk Owner” field.
- Ensure the assigned risk owners possess the expertise and resources to monitor and address the risk effectively.
- Encourage collaboration among risk owners and other team members to enhance the effectiveness of risk mitigation efforts.
To automate Jira activities or the assignment of risk owners in Jira based on specific criteria or conditions, follow these steps:
- Navigate to “Project settings” → “Automation” in your service project or “Service project settings” → “Automation” in a team-managed service project.
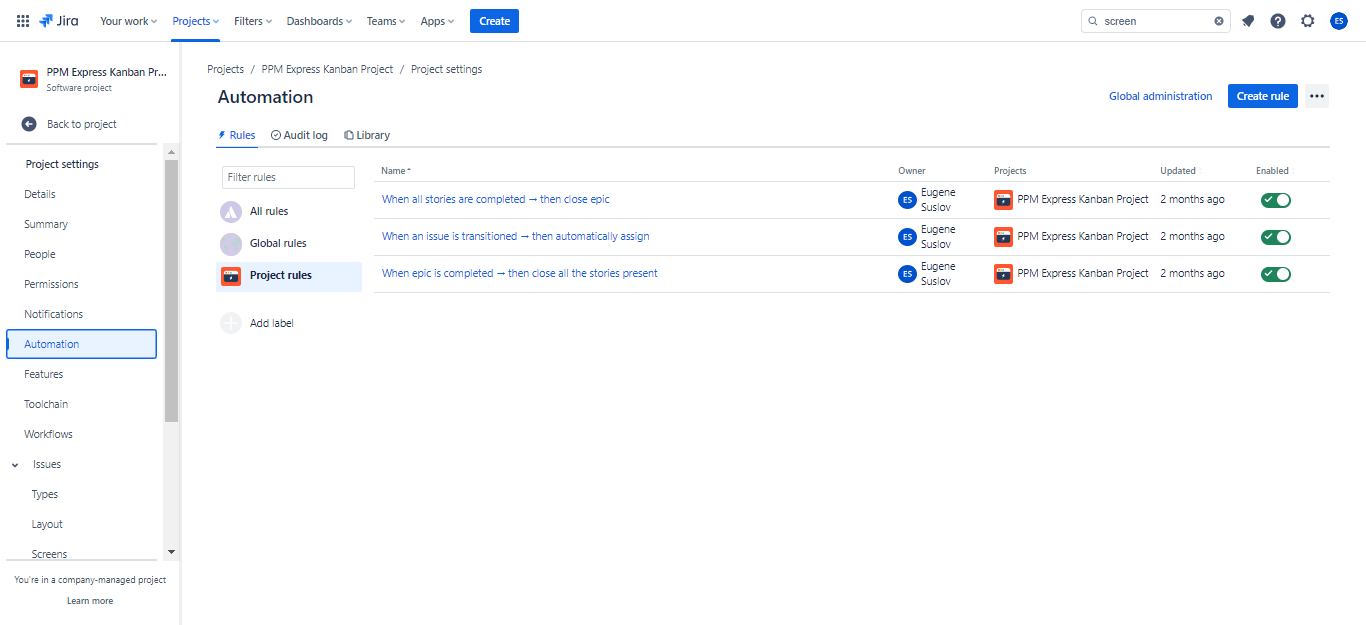
- Click on “Create rule” specifically for risk ownership assignment in the top-right corner.
- Select a trigger to initiate the rule. Adjust the trigger settings as needed and save. Select “New component” to set conditions, actions, or branches on the rule if desired.
- Choose between adding a new branch, action, or condition.
- Customize the settings for the selected component to assign the appropriate user to the “Risk owner” field automatically.
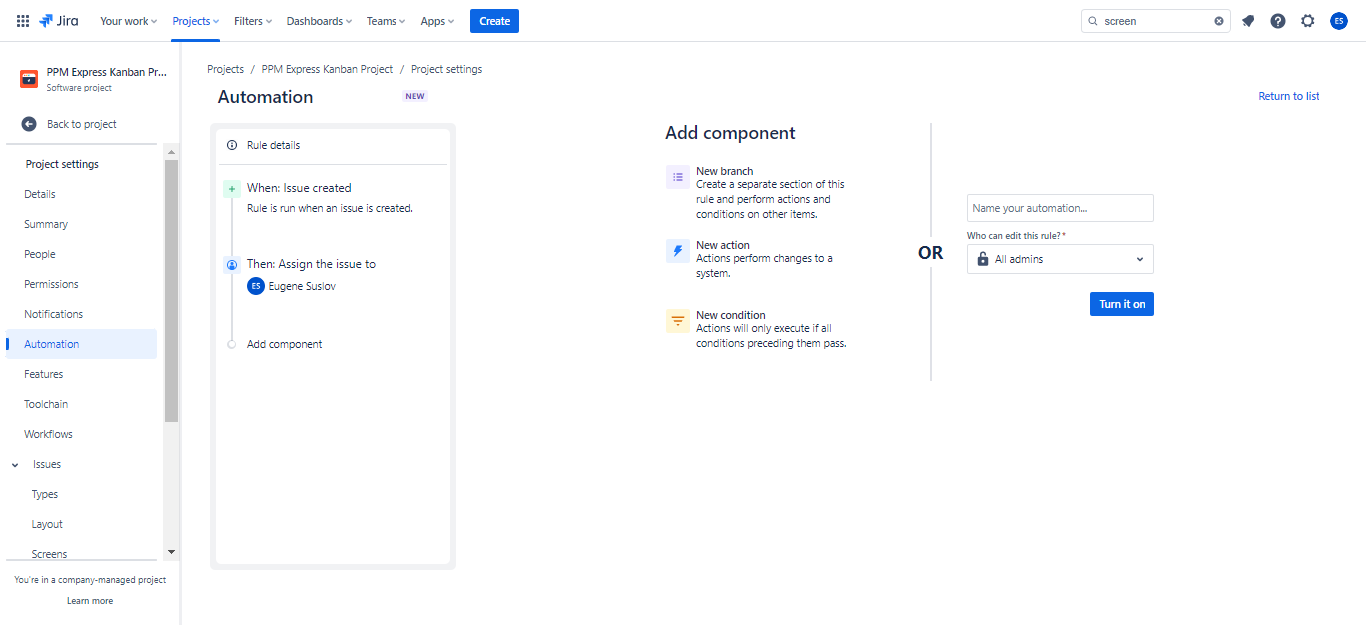
- Save the settings for the branch, action, or condition. Give the rule a name and toggle it on to activate.
Repeat steps 6-8 to configure additional components for the automation in Jira.
By implementing this automation, Jira will automatically assign the relevant user to the Risk Owner field whenever a risk meeting the specified criteria is identified.
Once risk owners have been assigned in Jira, the next critical step is to develop a comprehensive risk management plan.
Developing a risk management plan in Jira and acting on it
Developing a comprehensive risk management plan is essential for effective risk mitigation.
Using Jira to develop a risk management plan, portfolio managers can proactively identify and address potential risks before they impact project outcomes.
To develop a risk management plan in Jira, portfolio managers can follow these steps:
- Identify potential risks using Jira's built-in reporting and data analysis capabilities and input from team members and stakeholders.
- Prioritize risks based on their likelihood and potential impact on the project, using Jira's sorting and filtering capabilities to identify the most critical risks.
- Develop a risk mitigation plan for each prioritized risk, assigning ownership and setting specific tasks and deadlines for mitigation efforts (our next step).
- Adjust risk management strategies based on changes in project scope, timeline, or other factors.
By creating Jira issues for mitigation actions, portfolio managers can ensure that all mitigation efforts are recorded and tracked in a centralized location.
To create Jira issues for mitigation actions, portfolio managers can follow these steps:
- Identify potential mitigation actions for each prioritized risk.
- Create a Jira issue for each mitigation action, assigning ownership and setting specific tasks and deadlines.
- Track progress toward mitigation goals using Jira's tracking and reporting tools to identify potential bottlenecks and areas for improvement.
Once a risk management plan has been developed in Jira and actions are being taken based on it, the next vital step is to monitor and review risks within Jira.
Monitoring and reviewing risks in Jira
Monitoring and reviewing risks are essential for effective risk management, allowing portfolio managers to track progress toward mitigation goals and adjust strategies as necessary.
By using Jira to monitor and review risks, portfolio managers can proactively identify potential issues and ensure that projects stay on track.
To monitor and review risks in Jira, portfolio managers can follow these steps:
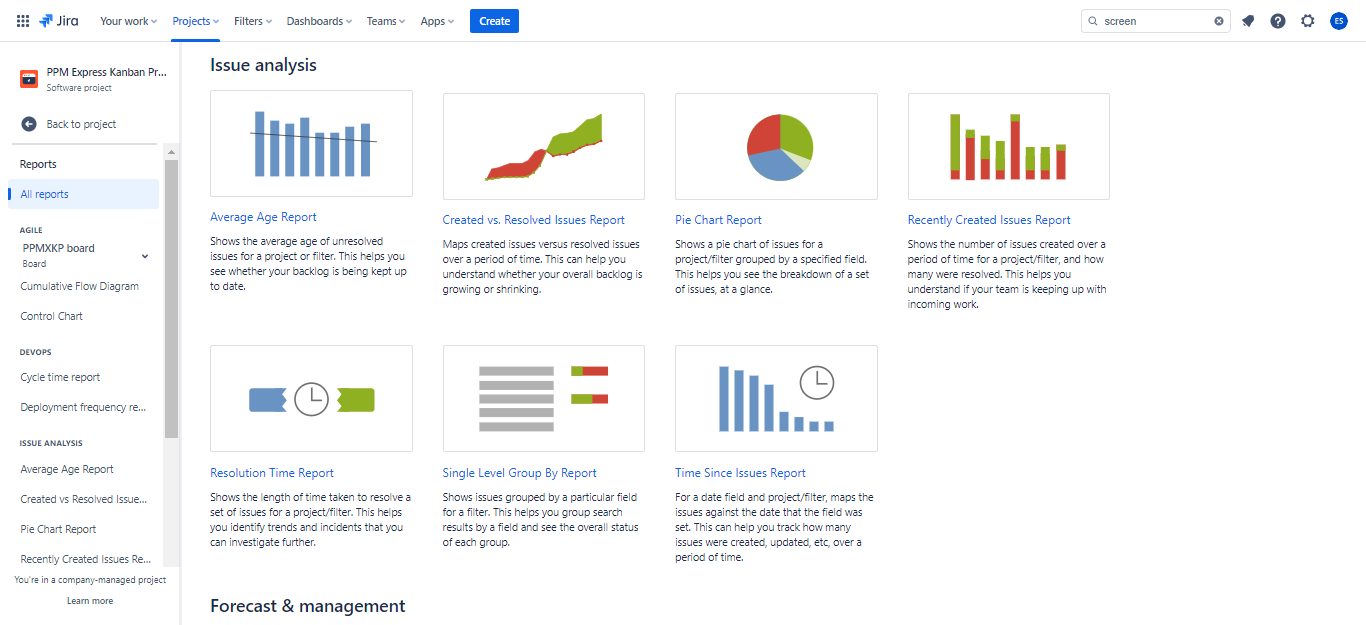
- Use Jira's built-in reporting and data analysis capabilities to monitor progress toward mitigation goals and identify potential issues:
- Users can access Jira's reporting section and customize pre-built reports to analyze risk and issue data. You can use the following reports: “Resolution Time Report”, “Single Level Group By Report”, and “Time Since Issues Report”.
- Utilize the dashboard as a centralized hub for monitoring and investigating risks and issues, ensuring prompt actions and informed decision-making. You can use the following widgets: “Assigned to Me”, “Average Number of Times in Status”, “Bubble Chart”, or “Issue Statistics”.

- Regularly review risks with team members and stakeholders, using Jira's collaboration features to facilitate discussion and feedback.
- Document lessons learned and best practices for future projects, using Jira's reporting and tracking tools to identify areas for improvement.
As we recognize the importance of monitoring and reviewing risks in Jira, it becomes evident that leveraging third-party solutions can take risk and issue management in Jira to the next level.
Leveraging third-party solutions for next-level risk and issue management in Jira
While Jira provides a powerful platform for managing project risks and issues, integrating external tools can further augment its functionality and enhance portfolio managers' capabilities.
These external tools offer specialized features and advanced functionalities that seamlessly integrate with Jira and other platforms, providing a comprehensive risk management ecosystem.
By incorporating these tools into their risk management practices, portfolio managers can unlock additional benefits such as:
- Advanced risk analysis: external tools provide advanced analytics and modeling capabilities for deeper risk insights and complex risk analysis.
- Streamlined workflows: integration with Jira simplifies and automates risk management workflows, fostering collaboration and efficient communication.
- Robust reporting and dashboards: external tools offer comprehensive reporting and visualization features for detailed risk reports and real-time tracking.
- Expanded portfolio management capabilities: tools offer broader functionalities, integrating risk data with resource allocation, budgeting, and strategic planning.
Here are some examples of external risk management tools that can be integrated with Jira:
- PPM Express: a comprehensive project portfolio management solution with risk assessment features, customizable dashboards, and seamless Jira connection with Azure DevOps, MS Project, and Smartsheet integration, enabling real-time tracking and prioritization of risk mitigation efforts.
- Riskonnect: a risk management solution providing comprehensive assessment, monitoring, and reporting capabilities. It includes advanced analytics, risk scoring, and customizable dashboards for effective risk tracking.
- LogicGate: a risk management and compliance platform that streamlines risk identification, assessment, and mitigation processes. It offers workflow automation, real-time reporting, and customizable risk assessment templates.
Having explored the benefits of leveraging third-party solutions to enhance risk and issue management in Jira, it is equally important to maximize the inherent capabilities of Jira itself for effectively managing project risks and issues.
Maximizing Jira's capabilities for managing project risks and issues
Using Jira for issue and risk management offers several benefits that make it an excellent choice for project and portfolio managers:
- Centralized platform: Jira, with additional adjustments, can provide a centralized platform for holistically managing issues and risks, eliminating the need for separate systems.
- Customization and flexibility: portfolio managers can customize issue and risk management workflows in Jira to align with specific project requirements.
- Integration with project management: Jira seamlessly integrates with project management features, enabling risk and issue management alignment with project plans.
- Collaborative environment: Jira fosters stakeholder collaboration, promoting effective communication and knowledge sharing.
- Powerful tracking and reporting: Jira's robust tracking and reporting capabilities provide real-time monitoring and data-driven insights for informed decision-making.
By maximizing Jira's capabilities for managing project risks and issues, portfolio managers can proactively approach risk and issue management and achieve optimal project outcomes.
Whether through Jira's built-in capabilities, customized workflows, or third-party solutions like PPM Express, a range of tools and strategies are available to help portfolio managers effectively manage project risks and issues.
Sign up for a free trial today to see how PPM Express can help maximize your risk and issue management efforts.