As a CTO or PMO in today's fast-paced IT industry, it's crucial to stay ahead of the curve with cutting-edge project management tools.
Are you looking for a way to increase productivity, streamline workflows, and optimize your team's performance?
The key to unlocking this potential lies in Jira and its automation, a powerful and versatile tool that can revolutionize your team's approach to project management.
Our guide will provide you with an in-depth understanding of Jira’s automation capabilities, enabling you to identify opportunities to boost efficiency and productivity in your organization.
You'll learn how to leverage automation in Jira to save time and enhance team collaboration with seamless integration.
Don't let your team's performance fall behind in this competitive landscape: unlock the full potential of Jira’s automation to elevate your organization's project management strategy to new heights.
Table of contents
- What is Jira, and why is automation important for teams using it?
- Jira's automation features overview
- 5 key types of automation to use in Jira
- Setting up automation in Jira in 8 simple steps
- 7 tips for using Jira’s automation effectively
- Common mistakes that teams make when implementing Jira’s automation
- Top 9 apps to extend automation capabilities
- Third-party tools for enhancing Jira’s automation and integration features
- FAQ (Frequently Asked Questions)
What is Jira, and why is automation important for teams using it?
Developed by Atlassian, Jira is a project management and issue-tracking tool designed to help teams plan, track, and manage their work.
While Jira provides many features for effective project management, the true potential of this powerful tool lies in its ability to automate repetitive tasks and streamline workflows.
Automation is essential for teams using Jira for several reasons:
- Time-saving: automation reduces the time spent on manual and repetitive tasks, such as updating statuses, assigning tasks, or adding comments.
- Consistency and accuracy: automated processes are less prone to human error, ensuring tasks are executed consistently and accurately.
- Improved collaboration: Jira’s automation facilitates better communication and cooperation by automatically notifying stakeholders about task updates, sending reminders, or escalating issues.
- Customization and scalability: automation in Jira is highly customizable, allowing teams to create tailor-made rules and triggers that align with their unique requirements.
By embracing the full power of Jira’s automation, you'll enable your team to focus on what truly matters—delivering high-quality results and driving project success.
Jira's automation features overview
Jira's automation capabilities offer a wide range of features. Here is an overview of the key automation features that can transform your team's approach to Jira:
- Automation rules: it allows users to create custom rules that automatically perform predefined actions based on specific triggers and conditions. These rules range from simple tasks, such as auto-assigning issues, to more complex ones, like creating sub-tasks or updating multiple fields simultaneously.
- Triggers: these are the events that initiate automation rules. Jira offers built-in triggers, such as issue creation, status updates, comments, etc. Also, users can create custom triggers.
- Conditions: these are filters that determine whether an automation rule should be executed or not. Conditions help ensure automated actions are performed only when specific criteria are met. Examples of conditions include issue priority, reporter, or custom field values.
- Actions: these automated tasks are executed once a trigger has been activated and the conditions are met. Jira supports many actions, such as updating fields, adding comments, transitioning issues, sending notifications, and more.
- Scheduled automation: Jira also allows you to schedule automated actions based on specified intervals or particular dates and times. This feature is useful for recurring tasks, such as generating reports, sending reminders, or updating statuses regularly.
- Cross-project automation: Jira's automation allows users to create rules that apply to multiple projects at once. This is especially valuable for organizations that manage several projects with similar workflows.
- Integration with third-party tools: Jira can also be integrated with various third-party tools and platforms, such as Slack, Microsoft Teams, and PPM Express, to facilitate seamless communication and collaboration within the team.
By leveraging these powerful automation features, your project teams can save time, reduce manual errors, enhance collaboration, and ultimately drive project success.
5 key types of automation to use in Jira
Jira offers a variety of automation types that cater to different project management needs and requirements. In this section, we'll explore five of them.
What is rule-based automation in Jira?
Jira enables users to create custom automation rules that perform predefined actions based on specific triggers and conditions.
Key features of rule-based automation include:
- Customizable triggers, such as issue creation, status updates, or comments
- Granular conditions ensure actions are executed only when specific criteria are met
- Access to a wide range of actions to automate various aspects of your team's workflow
This type of automation is beneficial for streamlining repetitive tasks, maintaining consistency in your project environment, and improving team collaboration.
What is scheduled automation in Jira?
Jira allows you to execute automated actions at predefined intervals or specific dates and times. Key features of scheduled automation include:
- Time-based triggers, such as daily, weekly, or monthly intervals
- Date-specific triggers, which allow you to schedule actions on particular days or at particular times
- The ability to combine scheduled triggers with conditions and actions for customized automation rules
This type of automation is ideal for managing recurring tasks, sending regular reminders, or generating periodic reports in Jira.
What is smart automation (Jira Service Management) in Jira?
Smart automation is exclusive to Jira Service Management (JSM) and is designed to enhance the management of service requests and customer interactions.
Key features of smart automation include:
- SLA-based triggers, such as breaches or approaching deadlines
- Automatic assignment of service requests based on agent availability or expertise
- Automated responses to customer inquiries or updates, ensuring timely communication
- Escalation and approval processes for critical service requests
This type of automation focuses on improving response times, streamlining customer communications, and ensuring adherence to service level agreements (SLAs).
What is manual automation (based on the manual trigger) in Jira?
Manual triggers enable users to initiate specific automation actions on demand by executing predefined automation rules with a simple click rather than relying solely on automatic triggers based on events, schedules, or conditions.
This automation can be helpful in situations where human review is necessary before you proceed with an action.
By incorporating manual triggers, you can create a more dynamic and adaptable work environment that caters to your team's specific needs and preferences.
What is automation based on external events (webhook triggers) in Jira?
Webhook triggers allow you to initiate automation actions in response to external events, enabling Jira's seamless integration with other tools.
Webhook triggers work by sending an HTTP request from an external service to Jira's automation engine.

Some advantages of using webhook triggers in Jira's automation include:
- Webhook triggers enable seamless integration between Jira and other tools, such as CI/CD pipelines, monitoring, or communication platforms
- By reacting to external events as they occur, webhook triggers ensure that Jira's automation actions are executed in real time, keeping your workflows up-to-date and responsive
- Webhook triggers can be tailored to respond to specific events from external services, allowing you to create custom automation rules that cater to your team's unique requirements
- Webhook triggers extend Jira's automation capabilities beyond its native features, allowing you to automate tasks and processes across a broader range of tools and services
By incorporating webhook triggers into your Jira automation strategy, users can create a comprehensive and adaptable project management environment that meets your team's diverse needs and objectives.
Experiment with different automation combinations in Jira to find the perfect balance.
Setting up automation in Jira in 8 simple steps
Effectively leveraging Jira's automation capabilities can revolutionize your team's productivity.
However, setting up automation rules that cater to your team's unique requirements can be daunting for those new to Jira's automation features. We want to help and make these steps as easy as possible.
Let’s walk through the process of using different types of automation in Jira to optimize your team's workflows:
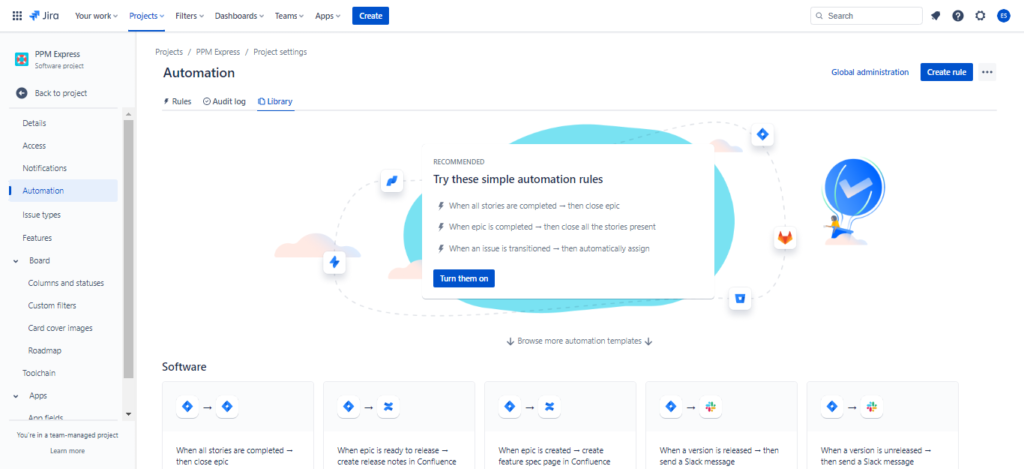
- Open the “Settings” tab: find the “Settings” gear icon and click on the “Projects” menu item. Then select "Automation" in the left sidebar to access the automation interface.
- Create a new rule: Click the "Create rule" button to start building your automation rule. This will open the rule builder, where you can define the rule's trigger, conditions, and actions.
- Find the pre-built automation (optional): you can choose from Jira’s prebuilt automation options in the automation templates library.
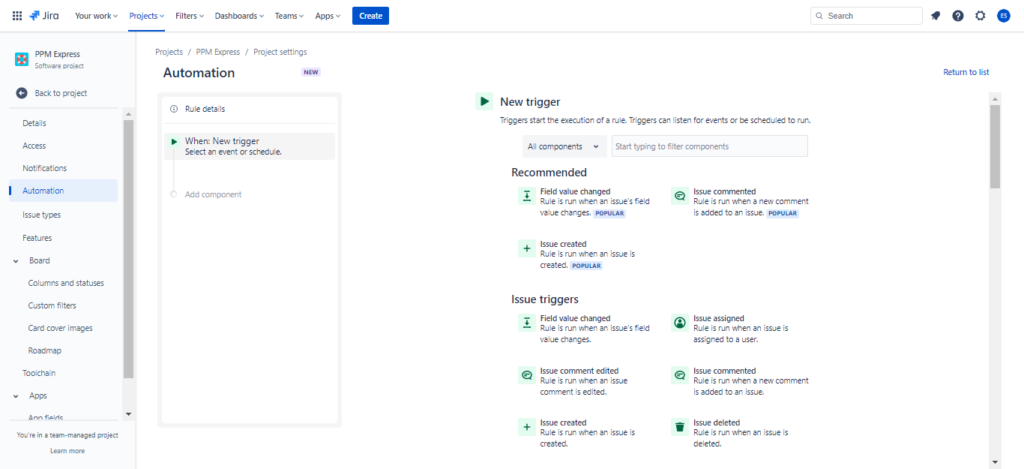
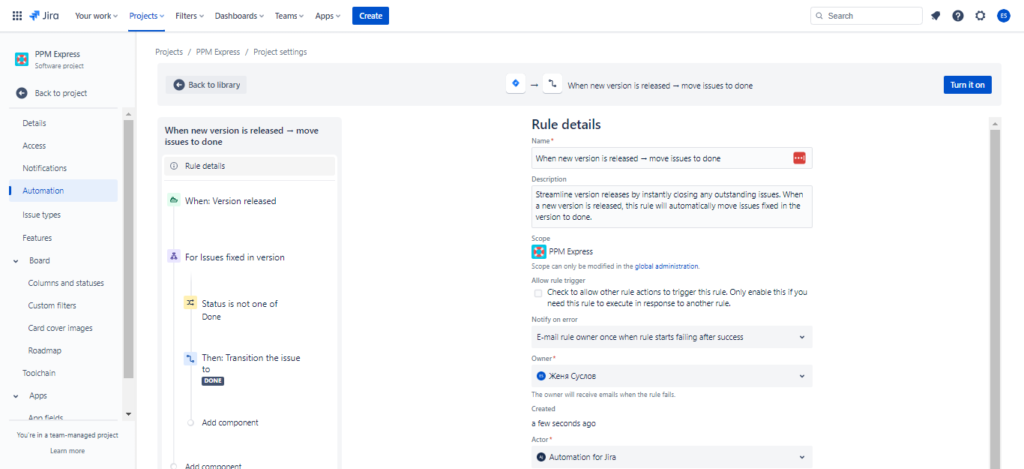
- Choose a trigger: select a trigger that will initiate your automation rule based on the specific task you want to automate. Most triggers help users create rule-based actions. To create another type of trigger, follow the instructions below:
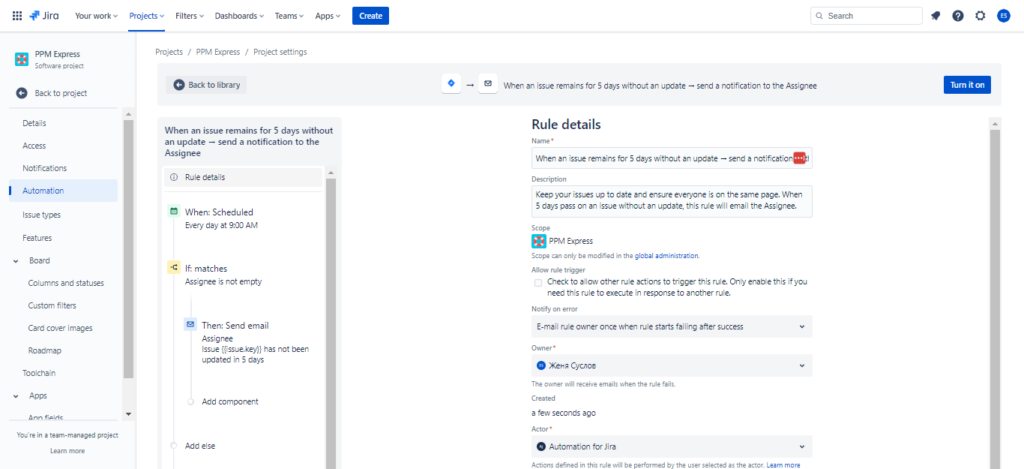
- You can choose the "Scheduled" trigger option with two variations: "At a scheduled time" or "On a recurring schedule."
- You can choose a JSM-specific trigger to initiate automation rules based on service request events and customer interactions.
- You can choose the "Manual trigger" option to initiate the automation action on demand through a custom action button on the issue.
- You can choose the "Incoming webhook" option to trigger your automation rule via external events through a webhook URL.

- Define conditions (optional): click the "Add condition" button and choose from the available options, such as issue fields, priority, reporter, or custom conditions.
- When using “Incoming webhook”, users need to set up the external service: create a new webhook in the external service, and use the generated URL from Jira as the target. Configure the external service to send the webhook when the desired event occurs.
- Specify actions: click on the "Add action" button and choose from a wide range of available actions, such as updating fields, adding comments, transitioning issues, or sending notifications.
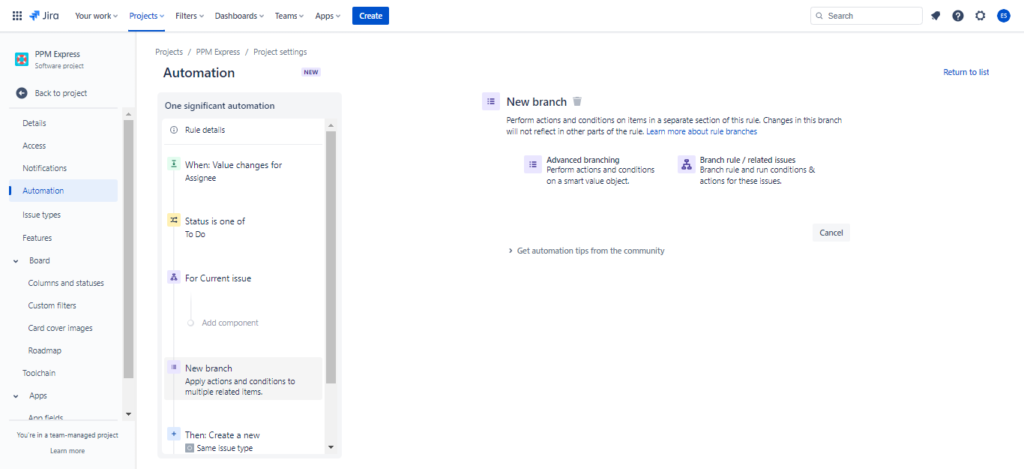
- Add a branch rule (optional): choose "Add component" and select "New branch" from the list of actions. This will create a new branch within your automation, allowing you to perform actions and conditions on items in a separate section of this rule.
- Configure the branch rule: specify the type of branch you want to use: “Advanced branch” or “Branch rule / related issues.”
- Add actions to the branch rule: within the branch rule, define the actions that will occur when the automation is executed.
- Configure rule details: provide a meaningful name and description for your rule to make it easier to manage and identify automation rules in the future.

- Test your rule (optional): it's good practice to test your automation rule before activating it to ensure it works as intended. You can add a manual trigger to activate rules and see how they work or add them to the sandbox project, where you test all your rules before enabling them.

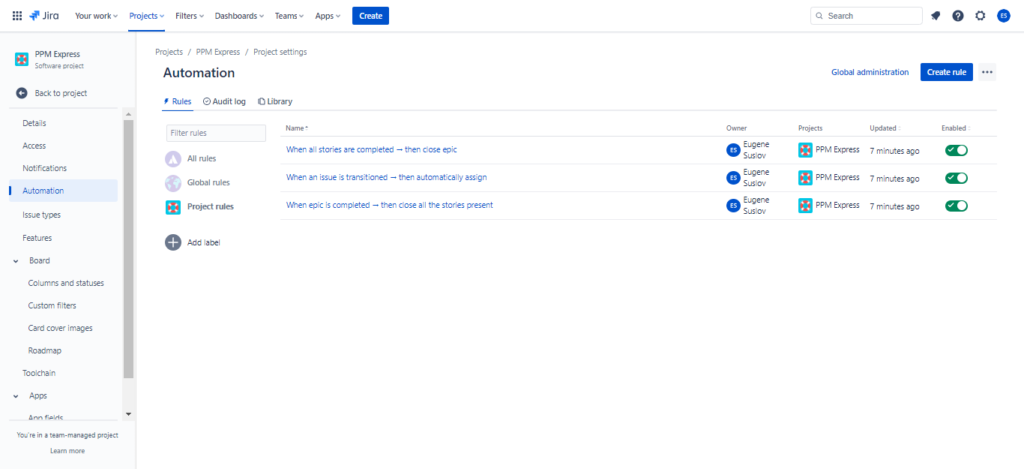
- Activate your rule: once you're satisfied with your rule configuration, click on the "Save changes" button to activate the rule. Your automation rule is live and will be applied to relevant issues within your project.
By following these steps, you can create and implement automation in Jira.
Don't hesitate to experiment with different triggers, conditions, and actions to create automation rules that cater to your team's unique needs and objectives.
7 tips for using Jira’s automation effectively
By implementing Jira's automation features and focusing on their specific advantages, you can ensure that your team reaps the rewards of a more efficient and agile work environment.
Let’s explore 7 essential tips, each accompanied by their respective benefits, to help you optimize Jira's automation capabilities:
- Start simple. Begin by automating simple, repetitive tasks that consume valuable time and resources. You can implement more complex rules and processes as you gain more experience and confidence with Jira's automation features.
- Prioritize high-impact automation. Prioritize automation that saves time, reduces manual effort, or improves the quality of your team's work. Focus on automating tasks that significantly impact your team's productivity and project outcomes.
- Test your rules. Before activating an automation rule, use the "Test" feature to ensure it works as intended. This can help you identify issues and fine-tune your rule configuration before you deploy it in your project.
- Document your rules. Maintain clear documentation of your automation rules, including their purpose, triggers, conditions, and actions. This will make it easier for team members to understand and manage your project's automation rules and ensure consistency across your organization.
- Regularly review and update your rules. As your team's needs and workflows evolve, it's essential to periodically review and update your automation rules to ensure they remain relevant and effective. This can help you optimize your automation strategy and stay agile in changing requirements.
- Build a “big picture view”. By using platforms like PPM Express, which integrates seamlessly with Jira and other project management platforms, you can gain better visibility of your projects, automate the creation of project plans, track dependencies, and monitor progress across your entire project portfolio.
- Encourage team collaboration. Engage your team in the process of developing and refining automation rules. By involving team members with diverse expertise, you can create comprehensive automation rules that address a wide range of use cases and improve overall project management.
By following these tips, you can make the most of Jira's automation capabilities and PPM Express to enhance your team's productivity, streamline workflows, and improve the overall quality of your project management processes.
Common mistakes that teams make when implementing Jira’s automation
As powerful as Jira's automation capabilities are, there can be challenges when implementing them for the first time. Teams may make mistakes that hinder the efficiency of their automation efforts, ultimately leading to suboptimal results.
By learning from the experiences of others, you can ensure a smoother adoption of Jira's automation features, maximizing the benefits for your team and paving the way for a more efficient, streamlined project management experience.
Let’s discuss these mistakes and offer some guidance on how to avoid them:
- Overcomplicating automation rules: keep your rules simple, focused, and easy to follow.
- Insufficient testing: always test your rules with representative issues or scenarios to ensure they work as intended.
- Neglecting documentation: maintain comprehensive documentation explaining each rule's purpose, triggers, conditions, and actions.
- Lack of team involvement: engage your team in the process, gather their input, and ensure the rules align with their requirements.
- Over-automation: strive for a balance between automation and human involvement, allowing your team to focus on high-value tasks that require creativity and critical thinking.
- Ignoring ongoing maintenance: regularly review and update your rules to ensure they remain relevant, efficient, and effective.
- Inadequate training: ensure your team members understand the available automation options, how to use them, and the benefits they offer.
- Not leveraging marketplace apps: explore available apps like Automation for Jira to find those that can enhance your team's project management experience and support your specific needs.
- Overlooking rule conflicts: evaluate your rules for potential overlaps or contradictions and resolve any disputes before implementation.
- Relying solely on Jira's native automation: while Jira's native automation features are powerful, some teams may benefit from using external tools, such as PPM Express or Zapier, connecting Jira with other applications, or creating more complex automation scenarios.
Remember to balance automation and human involvement, engage your team in the process, and continuously review and refine your automation rules to adapt to your team's evolving needs.
Top 9 apps to extend automation capabilities
While Jira's native automation features provide a solid foundation for streamlining workflows and enhancing productivity, a whole world of possibilities is waiting to be explored in the Jira Marketplace.

With a vast array of apps and integrations designed to extend Jira's automation capabilities, the Marketplace offers an opportunity to expand an automation strategy beyond Jira's basic features.
Here is a list of the top 9 apps that can help you enhance Jira's automation capabilities:
- Automation for Jira: this powerful app adds advanced automation features to Jira, allowing the creation of custom rules with enhanced triggers, conditions, and actions. It offers a user-friendly interface and supports both cloud and server instances.
- ScriptRunner for Jira: this versatile app enables the creation of custom scripts, automates tasks, and extends Jira's built-in functionalities. It offers many pre-built script templates and supports Groovy scripting for more complex automation scenarios.
- JMWE (Jira Misc Workflow Extensions): this is a collection of workflow extensions that provide additional post-functions, conditions, and validators for Jira's workflows.
- Tempo Timesheets: this time-tracking and reporting app automates the process of logging work hours, generating timesheets, and creating custom reports.
- Structure by Tempo: this project management app introduces a hierarchical organization of issues and projects by offering features such as automated issue organization, progress tracking, and customizable views, allowing for more efficient project management.
- Actions for Jira Service Management: this app enhances the automation capabilities of Jira Service Management by providing additional triggers, conditions, and actions that streamline customer interactions, manage SLAs, and improve service request management.
- Time to SLA: this is an SLA management app that helps you monitor, measure, and report your team's adherence to SLAs. It offers customizable SLA rules, visual indicators, and automated notifications.
- Jira Workflow Toolbox: this app offers tools to extend and customize Jira's workflows. It provides additional post-functions, conditions, and validators, as well as the ability to create dynamic forms.
- Elements Connect: with this app, you can create dynamic fields that automatically populate with data from external systems, such as databases, REST APIs, or other applications.
These top 9 apps in Jira's Marketplace can help you extend the automation capabilities of your Jira instance, ensuring a more efficient and streamlined project management experience.
Explore these apps and find the ones that best suit your team's unique needs and objectives.
Third-party tools for enhancing Jira’s automation and integration features
While Jira's automation capabilities, along with various Marketplace apps, offer a comprehensive solution for streamlining workflows and improving productivity, there are times when organizations require additional tools that cater to their unique project management needs.
Let’s explore some powerful third-party tools that can help you elevate your Jira automation capabilities and enhance your project management experience.
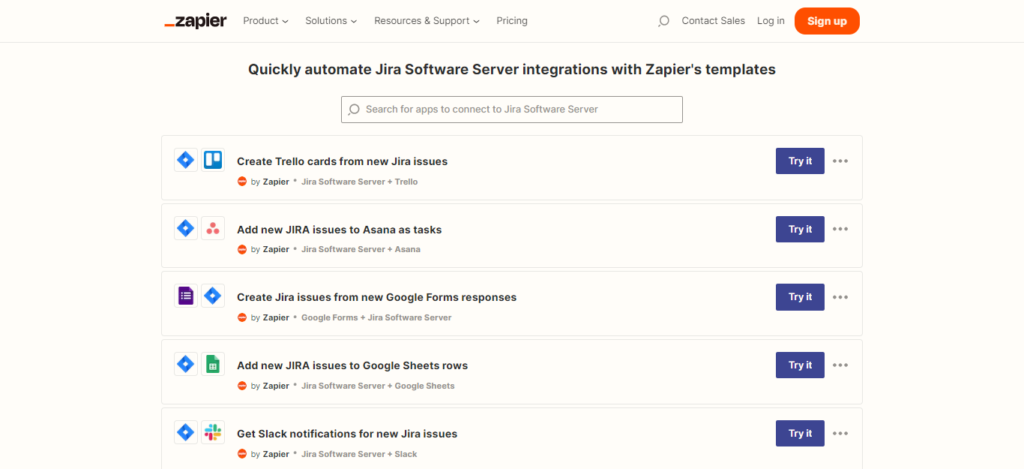
- Zapier is a popular automation platform that enables you to connect Jira with over 3,000 other apps and services. With its easy-to-use interface, you can create custom "Zaps" between Jira and other tools to automate tasks such as issue creation, updates, or notifications without coding.

- Make.com (formerly Integromat) is a versatile integration and automation platform that allows you to connect Jira with many other applications. Using its visual builder, you can create complex, multi-step automation scenarios to streamline your workflows between Jira and different tools.

- Microsoft Power Automate (formerly Microsoft Flow) is a robust automation platform that allows you to create automated workflows between Jira and various Microsoft tools, such as Office 365, Dynamics 365, and SharePoint.
These third-party tools offer significant advantages for organizations looking to extend their Jira automation capabilities, integrate with other tools and services, and create customized automation solutions that cater to their specific needs.
PPM Express: a powerful partner to Jira's automation capabilities outside its marketplace
Another tool that goes beyond the offerings of the Jira Marketplace is PPM Express, a robust project and portfolio management platform that complements Jira's automation features.
PPM Express helps you manage your project portfolio by offering valuable features such as:
- Centralized portfolio overview: PPM Express consolidates information from multiple projects in Jira and other tools like MS Project, Smartsheet, and Azure DevOps, providing a centralized view of your project portfolio.
- Advanced reporting: PPM Express provides a comprehensive set of reports and dashboards, allowing you to monitor project status, track team productivity, and identify areas for improvement.
- Resource management: PPM Express lets you efficiently allocate and manage resources across multiple projects, ensuring your team members work on the right tasks at the right time.
- Budget and cost management: you can keep track of project costs and budgets with PPM Express's robust financial management and reporting tools, which ensure you stay on budget and deliver maximum value.
- Seamless integration: PPM Express integrates smoothly with Jira, allowing you to leverage your existing Jira data and workflows while adding advanced project and portfolio management capabilities.
By incorporating PPM Express into your project portfolio management toolkit, you can unlock new levels of efficiency, visibility, and control, ensuring the success of your projects and the satisfaction of your stakeholders.
Additionally, integrating PPM Express with Jira can enhance your project management experience by providing advanced portfolio management features.
PPM Express offers greater visibility of your projects, automates the creation of project plans, tracks dependencies, and monitors progress across your entire project portfolio.
Embracing Jira's automation capabilities and integrating tools like PPM Express allows your team to concentrate on the important things that drive project success. Don't hesitate to try PPM Express and explore the benefits of an enhanced project management experience.
FAQ (Frequently Asked Questions)
What is Jira automation, and why is it important for teams? Jira automation is a set of features that help teams automate repetitive tasks, streamline workflows, and improve productivity within their Jira projects. It is important because it enables teams to save time, reduce manual work, and focus on high-priority tasks, ultimately leading to more efficient project management.
What are the main types of automation available in Jira? The main types of automation in Jira include rule-based automation, scheduled automation, smart automation, manual triggers, and webhook triggers.
How do rule-based, scheduled, and smart automations differ in Jira? Rule-based automation involves setting up triggers, conditions, and actions to automate tasks based on specific events. Scheduled automation allows you to automate tasks regularly based on a predetermined schedule. Smart automation uses machine learning and AI to predict and automate tasks based on patterns and trends in your data.
How can I use Jira's automation to improve my team's workflow? To improve your team's workflow with Jira's automation, start by identifying repetitive tasks and processes that can be automated. Then, choose the appropriate type of automation and create rules to automate those tasks. Remember to test and refine your automation rules to ensure they work effectively.
What are some common mistakes teams make when implementing Jira automation? Common mistakes include over-automating tasks, not testing rules before implementation, creating overly complex rules, neglecting user permissions, and failing to maintain and update automation rules as processes evolve.
How can third-party apps and tools enhance Jira's automation and integration capabilities? Third-party apps and tools, such as those available in Jira's Marketplace or external solutions like PPM Express, can help extend Jira's automation capabilities by providing additional features, integrations, and customization options that may not be available with Jira's built-in automation features.